We’ve done a Getting started with the AWS Ansible Collection already, so this time we will go all in with the collection, aiming to set up a fresh EC2 VPC complete with an instance that hosts a web server. To get there, we will follow the steps in this article from Amazon. And we will do it all in Ansible. Educational, interesting and useful!
Update (2020-07-27): Amazon decided to remove the original article. Our links now point to the archived version of the article.
Introduction
Like in the reference guide for setting up a VPC by Amazon, we will do the following steps:
- Step 1 - Create a VPC, complete with a public subnet, an Internet gateway, and a custom routing table for the Internet routing,
- Step 2 - Create a security group that will allow the traffic useful to us, while blocking all the other ports,
- Step 3 - Launch an EC2 instance in our VPC,
- Step 4 - Assign an Elastic IP that will let us access our instance over the Internet.
And, as a bonus, we’ll do:
- Step 5 - Install a web server that will serve a static web page. Because proof is in a successful HTTP 200.
Installation
Let’s make a fresh start and quickly install everything we need. Make sure you have Ansible 2.9 installed. Then run:
$ pip3 install --user -U boto boto3
$ ansible-galaxy collection install -f steampunk.aws
$ ansible-doc steampunk.aws.ec2_instance
If you’re here and you see the collection documentation, you’re on the good way. If not, please check the docs on the AWS Ansible Collection installation.
Our playbook
The instructions work with Steampunk AWS Ansible Collection version 0.8.2 or newer, which is where we should be, having followed Installation instructions earlier on.
Throughout the article, we will be building two documents: playbook.yaml will
contain the meat of the VPC setup. The best thing about Ansible is that we
are free to run the same playbook over and over again, with the actual changes
only taking effect once for each task.
To keep things tidy, we’ll also evolve a vars.yaml document, containing
Ansible variables of the settings that are important to us.
One last thing before we start is to set up our AWS credentials and region:
$ export AWS_SECRET_KEY=fill-me-in
$ export AWS_ACCESS_KEY=fill-me-in
$ export AWS_REGION=eu-central-1
Spoiler alert: if you don’t feel like copying and pasting text from this post, feel free to get the files that we have conveniently made complete for you here.
Step 1 - Create a VPC
In the creating the VPC step, the instructions guide us through a wizard. Like the wizards usually do, it performs its magic to create a bunch of things for us in the background. Using Ansible, we will, of course, make everything explicitly, but that won’t be too hard to do.
The wizard starts by asking us a few basic things up front. We will create a
vars.yaml file to store their equivalents for our playbook. Here is what we
need to supply, and what variable name we will use for each respective setting:
- We will give the VPC a human-friendly name:
vpc_name. - A CIDR block that the VPC itself uses:
vpc_cidr. - A name of the public subnet that will be in use in the VPC:
subnet_name. - A CIDR for the public subnet:
subnet_cidr.
Our initial vars.yaml will look like this:
---
vpc_name: Steamy VPC
vpc_cidr: 10.0.0.0/16
subnet_name: steamy-subnet
subnet_cidr: 10.0.0.0/24
And we can be off to create the playbook.yaml. At its top, we define the
play’s header, defining that it will run on our localhost and therefore it
does not need to gather any facts about our control node:
---
- name: Create an AWS VPC
  gather_facts: false
  hosts: localhost

  tasks:
We want our play to use the variables from vars.yaml, so in the
playbook.yaml, we first include:
    - name: Read default variables
      include_vars:
        file: vars.yaml
For simplicity’s sake, we will proceed with default values for all the other options. Creating a VPC, then creating a subnet for the VPC looks as follows:
    - name: Create a VPC
      steampunk.aws.ec2_vpc:
        name: "{{ vpc_name }}"
        cidr: "{{ vpc_cidr }}"
        tags:
          creation_type: ansible
      register: vpc

    - name: Create a public subnet
      steampunk.aws.ec2_subnet:
        name: "{{ subnet_name }}"
        vpc: "{{ vpc.object.id }}"
        cidr: "{{ subnet_cidr }}"
        tags:
          creation_type: ansible
      register: subnet
As you can see, we register an Ansible variable in each task, because their outcomes are typically useful when we need to refer to some resource in tasks that come later.
The wizard creates two more things for us: an Internet gateway attached to the
VPC, and a custom route table, which lets the instances created in the VPC to
reach out to the Internet via the Internet gateway. To re-create that, we first
add the variable igw_name containing the name of the Internet gateway, and the
route_table_name with the name of the custom route to our vars.yaml:
igw_name: steam-pipe-valve
route_table_name: steamy-route
The following goes to the end of playbook.yaml:
    - name: Create an Internet gateway
      steampunk.aws.ec2_internet_gateway:
        name: "{{ igw_name }}"
        vpc: "{{ vpc.object.id }}"
      register: igw

    - name: Route the internal subnet traffic via the Internet gateway
      ec2_vpc_route_table:
        vpc_id: "{{ vpc.object.id }}"
        subnets:
          - "{{ subnet.object.id }}"
        routes:
          - dest: 0.0.0.0/0
            gateway_id: "{{ igw.object.id }}"
        tags:
          Name: "{{ route_table_name }}"
Feel free to run the playbook now:
$ ansible-playbook playbook.yaml
We actually mean it: do run it now even if we’re not done with the playbook yet. If everything is as it should be, you’ll have some steamy new resources in your region’s EC2. You can go and check out the resources in your VPC console, make sure you are in the correct region, then visit, in turn, Your VPCs, Subnets, Route Tables and Internet Gateways. We don’t mind.
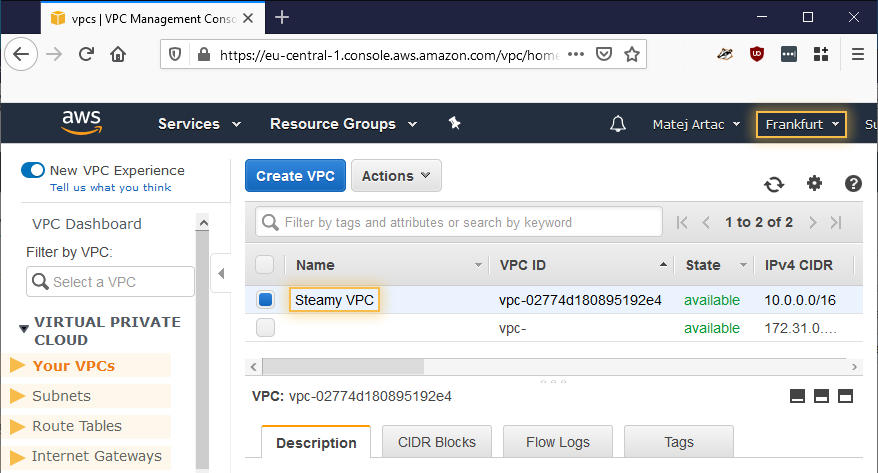
Newly created resources as can be seen in the VPC Console.
Step 2 - Create a security group
In our re-creation of the Step 2: Create a security group, we will be
creating a VPC that will permit inbound traffic on the HTTP port 80 and the SSH
port 22. In our vars.yaml, we will add two new variables:
Human-friendly name of the security group:
security_group_name.The public IP which we are visible to AWS on:
my_public_ip. This is to follow a good security practice of only allowing administration access to EC2 instances from a limited number of locations. You will, of course, need to supply your own value here.
Here are the lines to add:
security_group_name: steamy-security_group
my_public_ip: 192.168.0.1/32 # This, of course, will not work, so supply your own
We then append the following to playbook.yaml:
    - name: Set up a security group
      steampunk.aws.ec2_security_group:
        name: "{{ security_group_name }}"
        description: Security group for the VPC Getting Started tutorial
        vpc: "{{ vpc.object.id }}"
        ingress:
          rules:
            - protocol: tcp
              port: 80
              ip_ranges:
                - cidr: 0.0.0.0/0
                  description: Steamy HTTP rule
            - protocol: tcp
              port: 22
              ip_ranges:
                - cidr: "{{ my_public_ip }}"
                  description: Steamy SSH
        tags:
          creation_type: ansible
      register: security_group
We can run the playbook again:
$ ansible-playbook playbook.yaml
Ansible will run the old tasks again, find that it has already done all the work, and leave the resources intact. The task that we’ve just added is new, so it will create the security group. Again, check the result in Security Groups of the VPC console.
Step 3 - Launch an instance in the VPC
In the Step 3, we finally get to create something that makes use of the scaffolding created so far, an instance that will be able to do actual work. But that also means that, while so far, everything has been free of charge (at least as far as the Amazon Billing is concerned), we are now getting into a paid territory. But we will go easy on your EC2 budget.
Before instantiating an instance, let us make sure that the SSH server on the instance will let our control node and our user in. We add the following two variables:
- The user-friendly name of the key pair:
key_pair_name. - The path to our public SSH key of the key that our ssh client (and, with it
in turn, Ansible) uses to connect to the hosts it controls:
key_pair_public_key.
We add the following lines to our vars.yaml:
key_pair_name: steamy-keypair
key_pair_public_key: ~/.ssh/id_rsa.pub
Adding the following to the end of playbook.yaml will take care of the key
pair:
    - name: Set up a keypair
      steampunk.aws.ec2_key_pair:
        name: "{{ key_pair_name }}"
        public_key: "{{ lookup('file', key_pair_public_key) }}"
      register: key_pair
Now for the task that will create an instance. First, we need to supply values to the following options, that we’ll present as variables:
- The AMI to use when creating the instance:
instance_ami. In the example, we will use an AMI for Ubuntu 18.04 in the region that we set at the top of the post. If this one doesn’t work for you, you might want to visit the Launch Instance wizard yourself to grab the AMI ID from the source. - Instance type that describes the size and number of compute resources we need
the instance to provide:
instance_type. - Human-friendly name of the instance:
instance_name.
As before, these all go into the vars.yaml:
instance_name: steamy-instance
instance_type: t3.micro
instance_ami: ami-0e342d72b12109f91 # Ubuntu Server 18.04 in region eu-central-1
We specify the rest of the needed associations directly in the task, so that
everything we’ve built so far will come together nicely: a subnet in the VPC,
the security group, and the keypair. Let’s add the following to the end of
playbook.yaml:
    - name: Launch an EC2 instance
      steampunk.aws.ec2_instance:
        name: "{{ instance_name }}"
        type: "{{ instance_type }}"
        ami: "{{ instance_ami }}"
        key_pair: "{{ key_pair_name }}"
        subnet: "{{ subnet.object.id }}"
        security_groups:
          - "{{ security_group.object.id }}"
        tags:
          creation_type: ansible
          role: web-server
      register: instance
Ready?
$ ansible-playbook playbook.yaml
Ansible seems to hesitate a bit when launching the EC2 instance, but this is
because the module is thorough in doing what we ask of it: once we see that
yellow changed: [localhost] line, we can be sure that our instance is up and
running! See for yourself in your Instances console view. The instance is
there and it’s running. Fantastic, right!
Except, this instance has no IP that we could connect to in order to actually, you know, do anything with the instance. In a majority of scenarios, this is as it should be, because we want to have our services running safely within the VPC without any worry of being accessed or attacked from the Internet at large. But in this particular case, we do want to get into our Instance.
Step 4 - Assign an Elastic IP
In Step 4, the guide instructs us how to allocate a public-facing IP
and associate it with an instance. Let’s add the following lines to
playbook.yaml to do just that:
    - name: Attach a public IP to instance
      steampunk.aws.ec2_vpc_address:
        instance: "{{ instance.object.id }}"
        tags:
          creation_type: ansible
      register: address
And for our convenience, let’s ask Ansible to show us the newly minted IP:
    - name: Display the public IP
      debug:
        msg: Your public IP is {{ address.object.ip }}.
You know what you need to do next.
$ ansible-playbook playbook.yaml
When we’ve run this, we received an output that looks like:
[...]

TASK [Attach a public IP to instance] ***********************************
changed: [localhost]

TASK [Display the public IP] ********************************************
ok: [localhost] => {
    "msg": "Your public IP is 18.156.61.110."
}

PLAY RECAP **************************************************************
localhost                  : ok=10   changed=1    unreachable=0    fail[...]
Let’s check if we can connect to the instance:
$ ssh [email protected]
[...]
Welcome to Ubuntu 18.04.4 LTS (GNU/Linux 4.15.0-1065-aws x86_64)
[...]
ubuntu@ip-10-0-0-171:~$
Success! Or, in case yours doesn’t connect with an excuse to the likes of a
time out or a “Resource temporarily unavailable”, do check if the my_public_ip
variable contains a correct IP for you.
But we haven’t come this far with the automation to now tap ourselves on our own backs and proceed manually! We shudder at the very thought.
A note of warning, however: our use of ec2_vpc_address is not idempotent,
meaning that from this point, each playbook run will generate a new Elastic IP.
So please keep an eye on your list of Elastic IPs. Or, if you prefer
not to leave anything to chances, see our cleanup
section, then come back to proceed with the next step.
Step 5 - Install a web server
A public IP capable of accepting SSH connections means we have a host for the
subsequent Ansible plays. So at the end of our playbook.yaml, let’s add
a task that will dynamically create a new group named instances, and add
all the needed details on our new instance as a host:
    - name: Hand over the new host to the dynamic inventory group
      add_host:
        name: my_instance
        groups: instances
        ansible_host: "{{ address.object.ip }}"
        ansible_user: "{{ instance_os_user }}"
        ansible_ssh_common_args: >
          -o IdentitiesOnly=yes
          -o BatchMode=yes
          -o UserKnownHostsFile=/dev/null
          -o StrictHostKeyChecking=no
The stuff in ansible_ssh_common_args is necessary to prevent the SSH client
from preventing ourselves to connect to unverified sources. And you probably
noticed the variable instance_os_user that we haven’t defined yet. So let’s
place it into vars.yaml with the username of that instance’s operating system:
instance_os_user: ubuntu
Back in playbook.yaml, we begin a new play that uses the dynamically created
instances as a host group:
- name: Install some software on the instance
  hosts: instances
  gather_facts: no
  tasks:
To start off patiently, we ask Ansible to indulge us and wait for the SSH server to become available at the instance:
    - name: Wait for the SSH to become available
      wait_for_connection:
From here on, it’s just the details of what we would like the instance’s operating system to run:
    - name: Install nginx
      apt:
        pkg:
          - nginx
        update_cache: yes
      become: yes

    - name: Create Hello Steampunk static page
      copy:
        dest: /var/www/html/index.html
        content: |
          <!doctype html>
          <html lang="en">
          <head>
            <title>Hello Steampunk!</title>
          </head>
          <body>
            <h1>Hello Steampunk!</h1>
            <p>Managing services in AWS EC2 with ease.</p>
          </body>
          </html>
      become: yes
And this should be it! Let’s see what this does:
$ ansible-playbook playbook.yaml
When the play finishes, grab the IP from the play’s output in the terminal (and, as said before, this won’t be the same IP as we’ve seen earlier) and put it into your favourite browser. You should get our greeting!
Cleaning up afterwards
Did you think that earlier on, we skipped Step 5 of the Amazon’s Getting started, because cleaning up is something our moms should do? We are not like that. We believe in tidying up after we’re done playing, regardless if the wallet funding our EC2 ventures is our own or our bosses’. So we’ve made the cleanup.yaml playbook for you to grab and use as normal:
$ ansible-playbook cleanup.yaml
All the tasks that start with “Destroy” should show the status changed.
Is that all?
We believe that we got you started nicely on the way just like the big ones. You now have a fresh VPC with something that works, but we also raised the game in a way that you can quickly and easily create new ones without needing to go through all the clicking.
Going ahead, you will encounter new questions, of course. Like how to provision services that span many instances, which are not directly accessible from our Ansible control node. Or how to best dynamically obtain the inventory to act upon for important tasks during the lifetime of your service.
Watch this space for more content. In the mean time, you can follow us on Twitter, LinkedIn, and Reddit.
Grab your copy of the Steampunk AWS Ansible Collection today by contacting us here!