


The Ansible inventory. Essential, yet often neglected part of Ansible. But not today. Today, we will bring it into the spotlight it deserves, and demonstrate some of its features that can help us simplify our life substantially when dealing with Amazon EC2. And we will start with a little bit of set theory, just like every other Ansible inventory blog post does ;)
Describing a set of elements
“What does the set theory have to do with Ansible’s inventory,” you ask? (“Is Tadej getting mad” is also a valid question, but let us ignore that one for now.)
Well, at its core, inventory is a collection of subsets of all possible hosts. Each of those subsets represents an inventory group we intend to manage using Ansible. So by defining an Ansible inventory group, we are describing a subset of hosts.
There are two common ways of describing a set. We can list each member of a particular set and call it a day. In mathematics, we call this notation the Roster notation. And while this method of describing a set is straightforward, it does not scale very well.
Alternatively, we can define a characteristic function that will tell us if the element that we just fed it belongs to our set or not. This notation is called set-builder notation. It scales much better because we only need to define what properties an item must have to be a member of our set.
In the Ansible world, those two methods of describing sets correspond to defining a static inventory and writing an inventory plugin configuration file.
EC2 inventory plugin
Anyone that used Ansible a few times knows about the static inventory. You
know, the dull inventory.ini file that you only create because you have to.
It usually looks something like this:
[backend]
pinky ansible_host=10.0.1.12
brain ansible_host=10.0.1.14

[database]
ren    ansible_host=10.0.1.20
stimpy ansible_host=10.0.1.21
Maintaining static inventory files is exceptionally error-prone if we need to manage more than a few hosts. And keeping the inventory file in sync with the available EC2 instances gets boring rather quickly.
EC2 inventory plugin helps us bypass all of those troubles. Let us have a look at the following sample configuration file:
---
plugin: steampunk.aws.ec2

groups:
  backend:
    tags:
      kind: backend
  database:
    tags:
      kind: database
The configuration file above defines the same two groups as the static
inventory example from before. Any instance that is tagged with the kind: database tag ends up in the backend inventory group. The same thing holds
for the database instances.
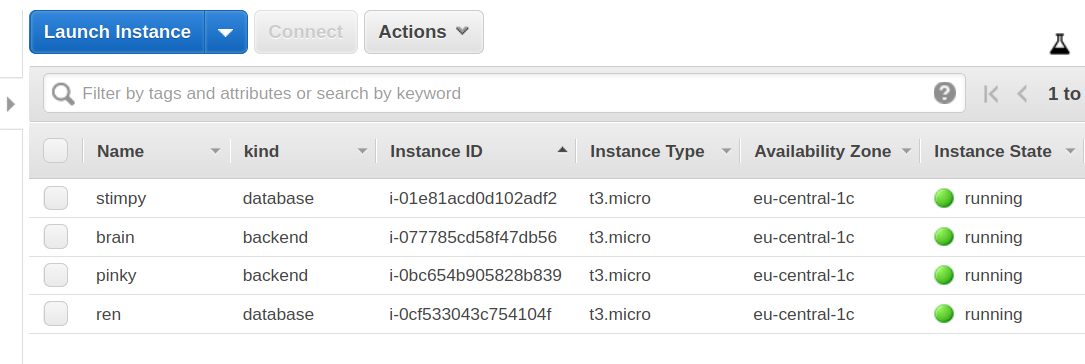
AWS EC2 instance listing for our example.
Inventory that Ansible generates from this configuration is always up-to-date. The inventory plugin will download the list of instances right before the playbook execution starts. So goodbye manual inventory edits. The only time we need to touch the configuration file is when we want to (re)define our groups.
The dynamic inventory configuration file size is proportional to the number of groups we define. The static inventory file size grows linearly with the number of instances that we manage.
Let us have a look at some practical (ab)uses of our EC2 inventory plugin.
Practical examples
Before we start, we need to inform Ansible that we will be using a custom
inventory plugin. For simplicity, we will set the ANSIBLE_INVENTORY_ENABLED
to steampunk.aws.ec2 and export it:
$ export ANSIBLE_INVENTORY_ENABLED=steampunk.aws.ec2
Consult the official documentation for other means of enabling inventory plugins.
The most straightforward configuration file that the EC2 inventory plugin will consider as valid is:
---
plugin: steampunk.aws.ec2
If we place the previous two lines of code into inventory.ec2.yaml file and
run ansible-inventory -i inventory.ec2.yaml --graph, we will get something
similar to this printed to the console:
@all:
  |--@ungrouped:
  |  |--pinky
  |  |--brain
  |  |--ren
  |  |--stimpy
The EC2 inventory plugin configuration file name MUST have a
.ec2.yamlor.ec2.ymlsuffix. EC2 inventory plugin ignores all other files.
In this setting, we can use ansible-inventory as another AWS CLI tool for
listing instances. Adding a --vars switch will also display some information
about each host:
@all:
  |--@ungrouped:
  |  |--pinky
  |  |  |--{ansible_host = 10.0.1.12}
  |  |  |--{id = i-057333a748ef7e040}
  |  |  |--{name = pinky}
  |  |  |--{private_dns = ip-10-0-1-12.eu-central-1.compute.internal}
  |  |  |--{private_ip = 10.0.0.12}
  |  |  |--{public_dns = }
  |  |  |--{public_ip = }
  |  |  |--{state = running}
  |  |--brain
  # Rest of the output removed for brevity
One thing worth emphasizing here is the ansible_host variable. Ansible uses
the value of this variable when it tries to establish an SSH connection. By
default, the EC2 inventory plugin will instruct Ansible to use a private IP
address when connecting. We can override this by setting the
ansible_host_source configuration option. Consult the EC2 inventory plugin
documentation for more details and examples.
Another beautiful thing EC2 inventory plugin allows us to do is to create and provision an instance without messing around with the IP addresses:
---
- hosts: localhost
  gather_facts: false

  tasks:
    - name: Launch an EC2 instance
      steampunk.aws.ec2_instance:
        name: server
        type: t3.micro
        ami: ami-0e8286b71b81c3cc1
        key_pair: demo_key
        subnet: subnet-123-id
        security_groups:
          - sg-123-id

    - name: Refresh inventory to ensure new instances exist in inventory
      meta: refresh_inventory

- hosts: server
  become: true
  gather_facts: false

  tasks:
    # EC2 instances report back "I am ready" way before the sshd is ready
    # to accept the connection.
    - name: Wait for host to be ready
      wait_for_connection:

    - name: Update all packages
      yum:
        name: "*"
        state: latest
The critical two lines here are name: server in the first play and hosts: server in the second play.
Why does this work? Because our EC2 inventory plugin uses instance’s name as the hostname when adding it to the inventory. And the meta task at the end of the first play is there to make sure that the second play gets accurate information about the host. If we were to omit this task, the playbook would fail to execute if the instance was not present at the start of the playbook execution.
And for the last example, let us interpret the following configuration file:
---
plugin: steampunk.aws.ec2

groups:
  prestigious:
    tag_keys: [ ansible ]
    tag:
      fuel: [ coal, wood ]
    filters:
      instance-state-name: stopped
      vpc-id: vpc-123
Can you guess what conditions an EC2 instance must fulfill to be a member of the prestigious group? Well, let us see:
- It must have an
ansibletag. - It must have a
fueltag whose value is eithercoalorwood. - It must be in a stopped state.
- It must be part of the
vpc-123virtual private cloud.
For more information about filtering, consult the EC2 inventory plugin documentation.
I cannot find the EC2 inventory plugin
The inventory plugin is part of the Enterprise Steampunk AWS Ansible Collection and is not available on Ansible Galaxy. Please, register here to grab your copy now!
What did we learn
One thing we hope we all learned today is that the inventory is not just some unnecessary complication. It is a vital part of our deployment. And by selecting the right tools for assembling it, we can make our lives much more pleasant.
We also discovered that math is hiding in just about anything we touch, but that is a story for some other time.
And as always, if you have any questions, you can reach us on Twitter, LinkedIn, and Reddit.
Cheers!


