


This post was originally published on the
XLAB Steampunk blog.
This post was originally published on September 22, 2020. The content has been updated to reflect the latest releases.
Some of our previous posts focused on infrastructure management using Ansible. We will take things one step further today and create a rudimentary self-service catalog using Ansible Automation Platform.
For those unfamiliar with the Ansible Automation Platform, it is software that allows you to centralize all aspects of infrastructure management. Think of it as a user-friendly wrapper around Ansible with role-based access control. You can get more information about it on the official page.
We will start today’s post with a short analysis of an Ansible Playbook that creates a single VM instance on AWS. Then, we will configure the Ansible Automation Platform so that we will be able to execute the said playbook. And for the grand finale, we will run the playbook and spend some money on AWS ;)
If you would like to follow along, you will need to have a working Ansible Automation Platform installation. Probably the easiest way to get it up and running is to use the official Vagrant box for RedHat Linux and activate Ansible Automation Platform with a trial license that you can obtain from the Red Hat.
A Sample Ansible Playbook
The Ansible Playbook that we will be using today looks like this:
---
- hosts: all
  gather_facts: false

  tasks:
    - name: Create a VM
      steampunk.aws.ec2_instance:
        name: "{{ i_name }}"
        type: "{{ i_type }}"
        ami: ami-0e8286b71b81c3cc1
        key_pair: demo_key
        subnet: "{{ i_subnet }}"
Regardless of whether we are using the Ansible Automation Platform, we need to do a few things before running that Ansible Playbook. We must :
- make sure Ansible has access to the boto3 Python package,
- install the steampunk.aws Ansible Collection,
- provide AWS credentials and region to the steampunk.aws.ec2_instance module via environment variables, and
- supply values for three variables that we use in the playbook.
We have some work to do, so we better start ;)
Create an execution environment
Ansible Controler executes Ansible Playbooks in an execution environment to isolate it from the rest of the system. By default, Ansible Automation Platform has three predefined execution environments:
- ee-29-rhel8 contains Ansible 2.9 for older Ansible Playbooks
- ee-minimal-rhel8 minimal container image with ansible-core==2.11 and basic collections
- ee-supported-rhel8 container image with ansible-core==2.11 and automation collections supported by RedHat
Unfortunately, those environments do not include all dependencies that the steampunk.aws collection needs, so we will create our own.
We cannot create a new execution environment from the web interface. Instead, we must ssh into the Ansible Automation Platform and create a custom execution environment from the terminal:
1. Create a file with galaxy dependencies:
Our new execution environment has to have our steampunk.aws collection installed, to achieve that, we need to specify the necessary collections in requirements.yml
The file should look like this:
collections:
- name: steampunk.aws
  version: 0.9.0
2. Create a file with Python dependencies:
We also need to define the dependencies for Python in the execution environment, in our case, the requirements.txt
boto3==1.26.60
btocore==1.29.60
psutil==5.9.4
3. Use Ansible Builder to create an execution environment
Here comes the fun part of creating an execution environment. We can create a new execution environment with ansible-builder and podman.
pip install ansible-builder
And check the version of podman:
podman --version
Now that we have the environment ready for creating a custom execution environment, we have to specify the main file, in our case, it will be named execuition-enviroment.yml.
---
version: 1

  build_arg_defaults:
    EE_BASE_IMAGE: registry.redhat.io/ansible-automation-platform-20-early-access/ee-minimal-rhel8
    EE_BUILDER_IMAGE: registry.redhat.io/ansible-automation-platform-20-early-access/ansible-builder-rhel8
  ansible_config: ansible.cfg

  dependencies:
    galaxy: requirements.yml
    python: requirements.txt
It uses our predefined files for collections and Python dependencies and specifies the BASE_IMAGE and the BUILDER_IMAGE. Next, we must create the container with the following:
ansible-builder build --tag my_ee
Then we need to push the image to the private automation hub:
podman push
If nothing went awry, we now have a new context file in the execution environment directory named context. We can check if our newly created environment has all the required Python packages and collections installed.
podman run -it localhost/my_ee:latest ansible-galaxy collection list

# /usr/share/ansible/collections/ansible_collections
Collection    Version
------------- -------
steampunk.aws 0.9.0
 podman run -it localhost/my_ee:latest pip3 list
Package          Version
---------------- -------
ansible-core     2.11.6
ansible-runner   2.0.4
asn1crypto       1.2.0
Babel            2.7.0
bcrypt           3.2.0
boto3            1.26.60
botocore         1.29.61
cffi             1.13.2
chardet          3.0.4
cryptography     2.8
decorator        5.0.7
docutils         0.14
gssapi           1.6.12
idna             2.8
Jinja2           2.11.3
jmespath         1.0.1
lockfile         0.11.0
lxml             4.4.1
MarkupSafe       1.1.1
ncclient         0.6.10
ntlm-auth        1.5.0
paramiko         2.7.2
pexpect          4.6.0
pip              20.2.4
ply              3.11
ptyprocess       0.5.2
pyasn1           0.4.8
pycparser        2.19
pykerberos       1.2.1
PyNaCl           1.4.0
pyOpenSSL        19.1.0
pypsrp           0.5.0
PySocks          1.7.1
pyspnego         0.1.5
python-daemon    2.1.2
python-dateutil  2.8.2
pytz             2019.3
pywinrm          0.4.1
PyYAML           5.4.1
requests         2.22.0
requests-credssp 1.2.0
requests-ntlm    1.1.0
resolvelib       0.5.4
s3transfer       0.6.0
setuptools       41.6.0
six              1.12.0
toml             0.10.2
urllib3          1.25.7
xmltodict        0.12.0
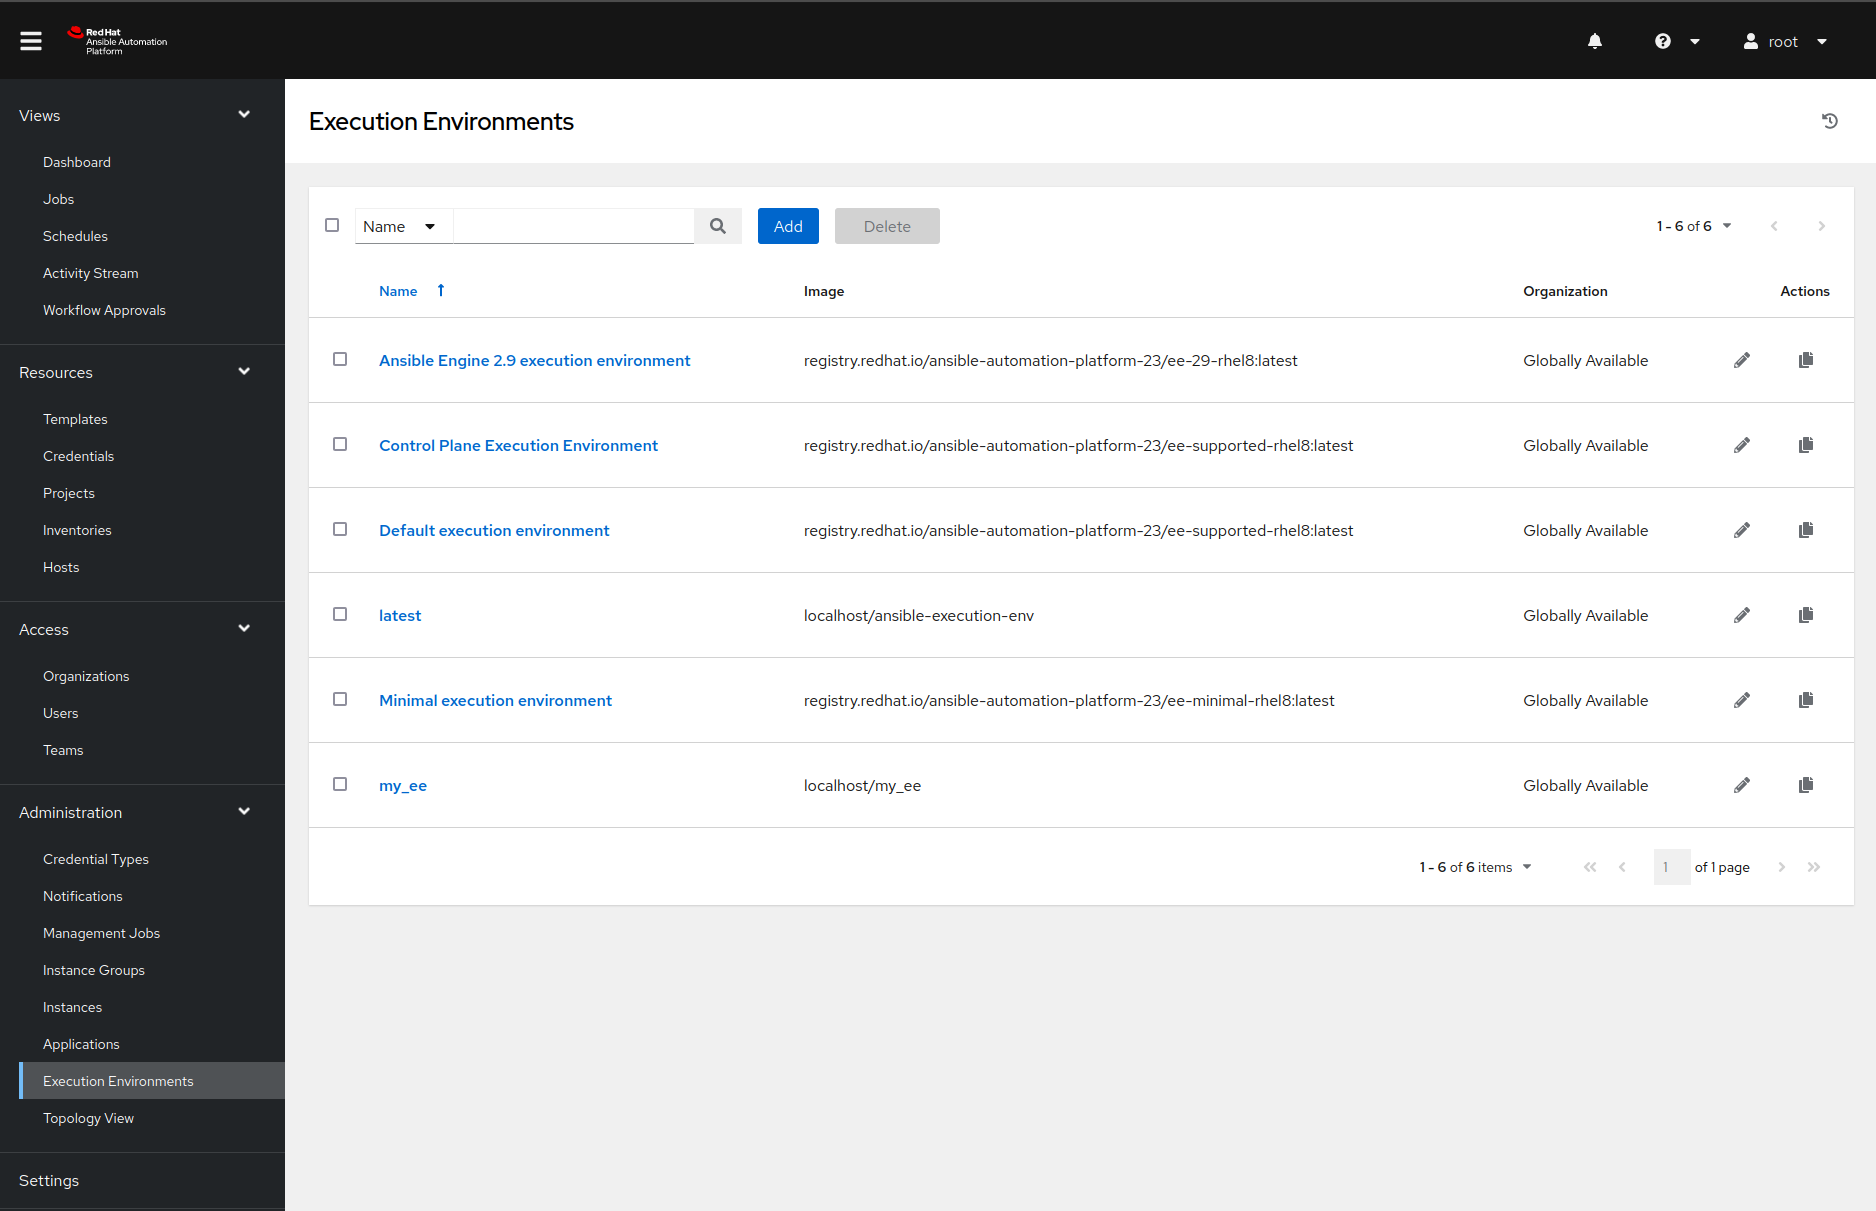
We can also see the newly created execution environment in our web interface for the Ansible Automation Platform.
Adding a sample project
Before we can run the Ansible Playbook in the Ansible Automation Platform, we must fetch it from the external source. Once we navigate to the Projects page and create a new project by clicking the Add button, then we should see something like this:
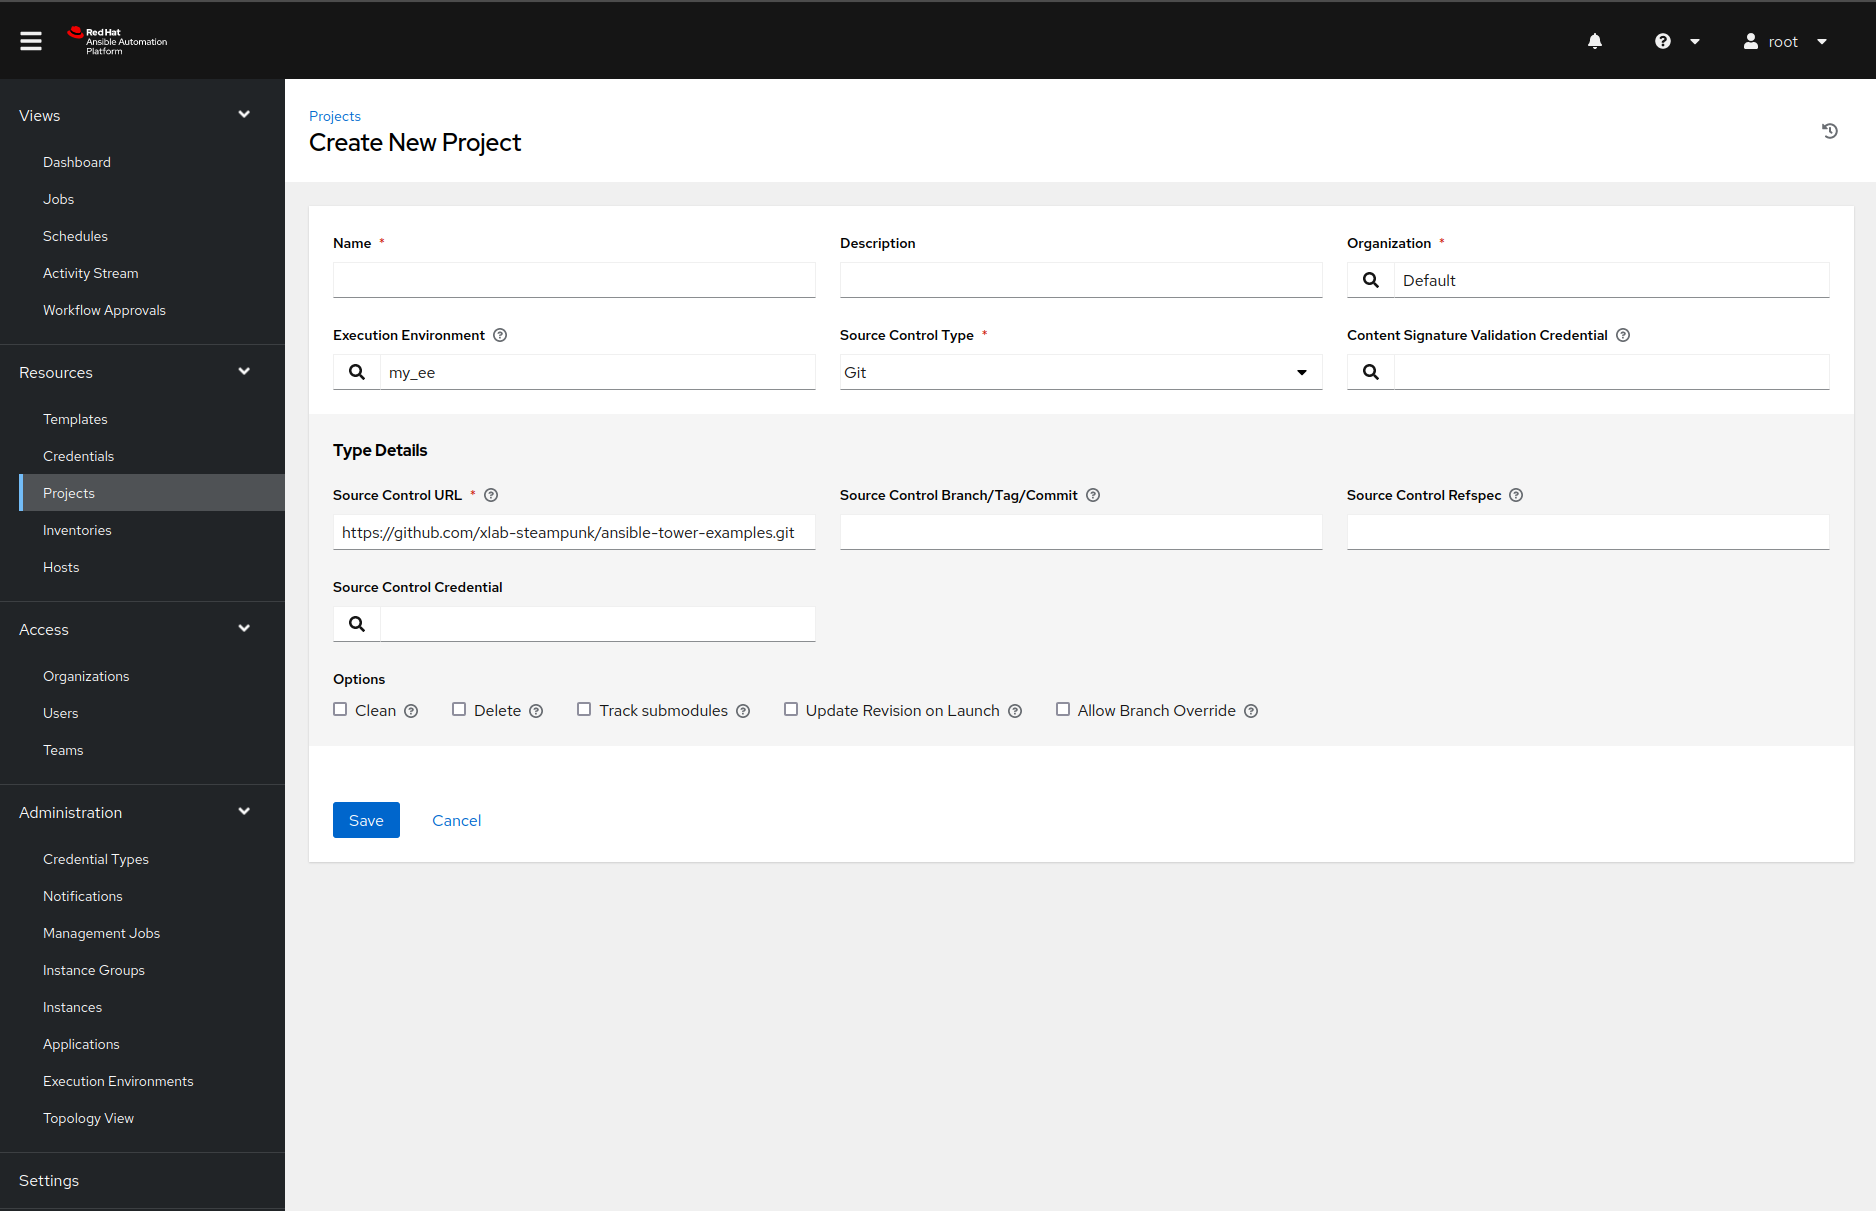
Feel free to change the configuration as you see fit, but make sure you set the SCM URL field’s value to https://github.com/xlab-steampunk/ansible-tower-examples.git and select the right Ansible execution environment, with the search button.
Once we add the project, the Ansible Automation Platform will fetch the sources and install the required Ansible collections. How does the Ansible Automation Platform know what collections our project needs? Because we listed them in the collections/requirements.yml file. Neat, right?
Supply the credentials
Supplying Ansible Playbooks with credentials is the most complicated step of the whole process. Why? Because we must first define a custom credential type and then create credentials of that type. But there is nothing a few screenshots will not solve ;)
Create a custom credential type
We can add a custom credential type by navigating to the Credential Types page and generate a name, then click the Add button. Filling in the name and description values should be manageable. However, the input and injector configuration fields are trickier.
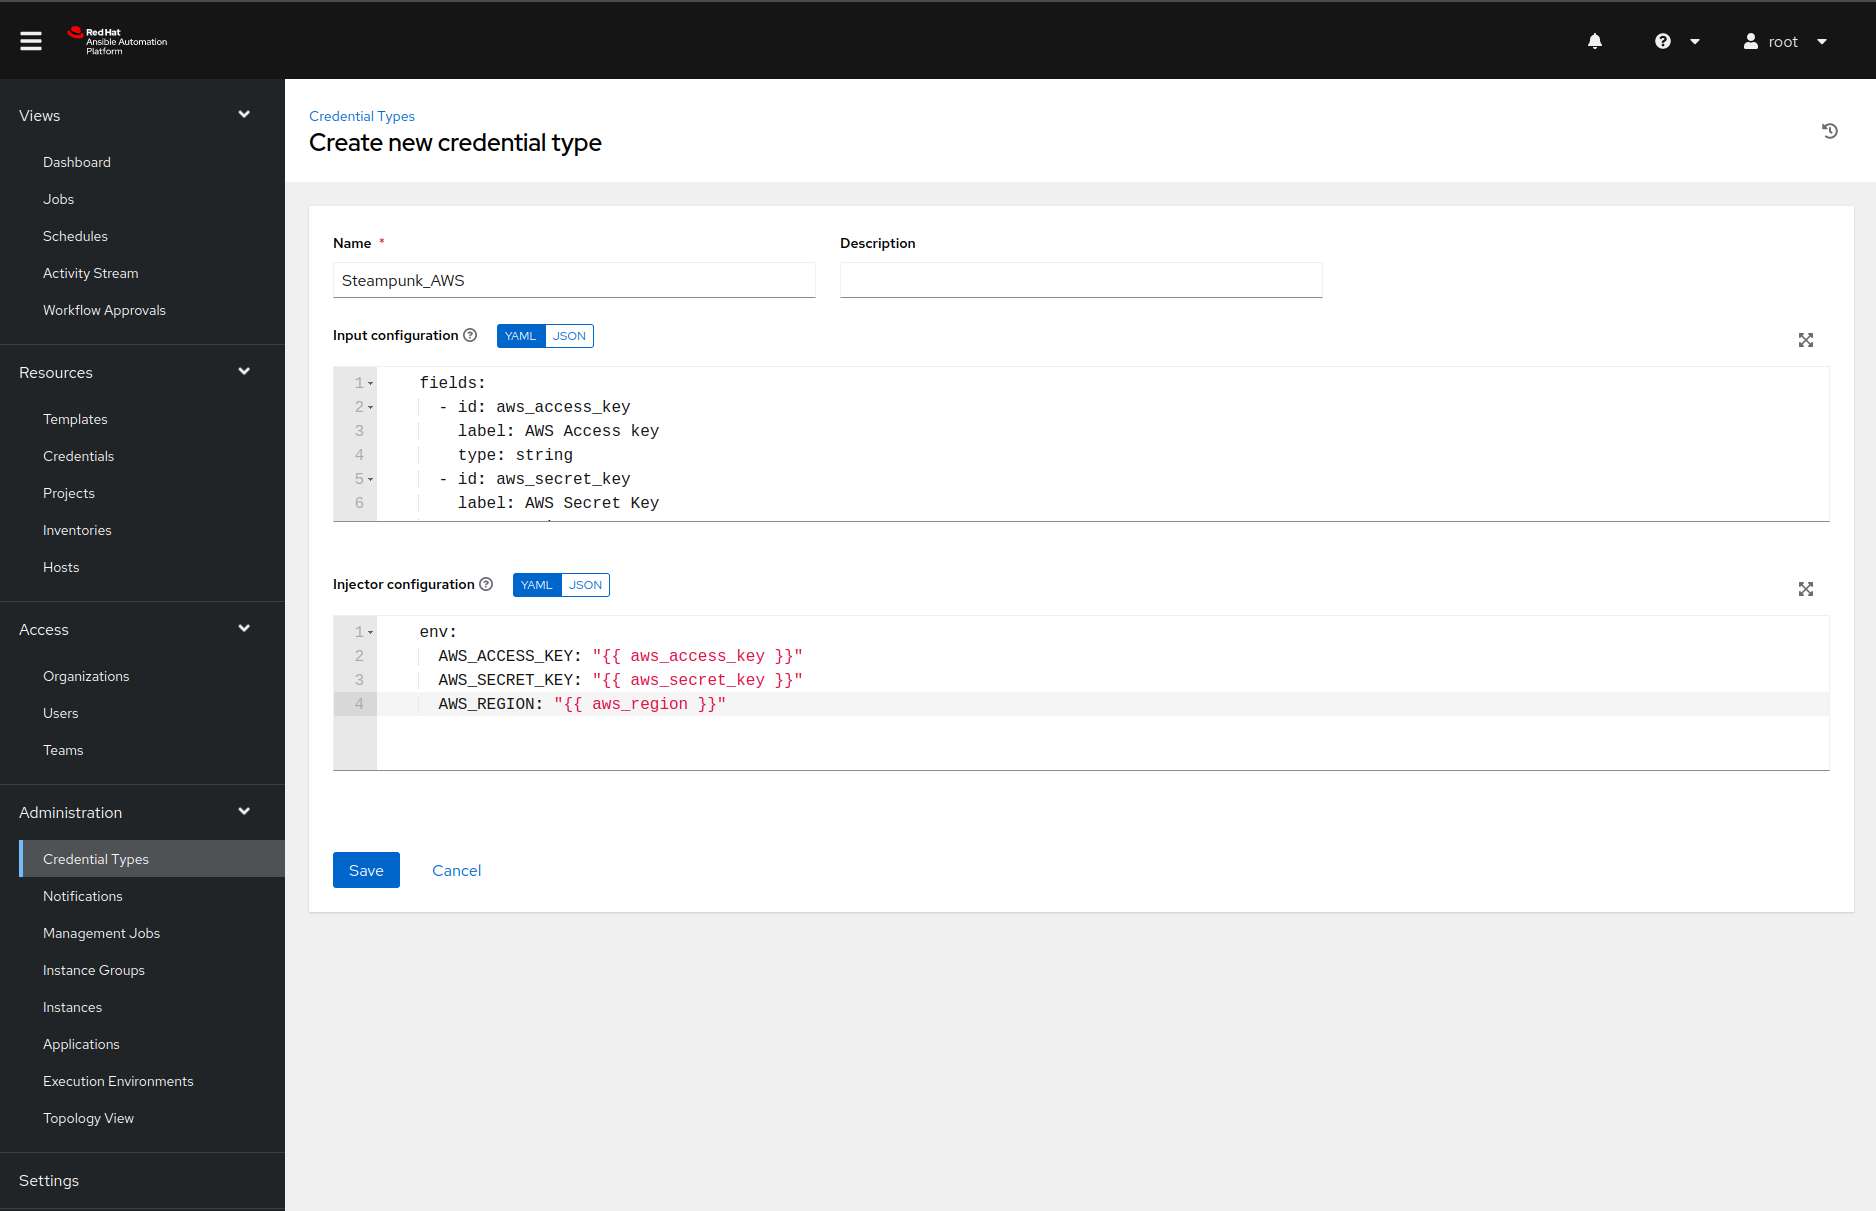
The contents of the input configuration field in our case is the following YAML document:
fields:
  - id: aws_access_key
    label: AWS Access key
    type: string
  - id: aws_secret_key
    label: AWS Secret Key
    type: string
    secret: true
  - id: aws_region
    label: AWS region
    type: string
    choices: [ eu-central-1, eu-north-1 ]
required:
  - aws_access_key
  - aws_secret_key
  - aws_region
That YAML document informs Ansible Automation Platform that our credential type has three
required fields and that the aws_secret_key contains sensitive information
that we would like to store encrypted.
The injector configuration describes how the Ansible Automation Platform should pass the credentials to the Ansible Playbook. In our case, we want to use environment variables:
env:
  AWS_ACCESS_KEY: "{{ aws_access_key }}"
  AWS_SECRET_KEY: "{{ aws_secret_key }}"
  AWS_REGION: "{{ aws_region }}"
And with one final click on the save button, we are done.
Add the AWS credentials
Now that we defined our custom credential type, we can add our AWS credentials to the Ansible Automation Platform. Once we navigate to the Credentials page and click on the Add button, Ansible Automation Platform will present us with the following form:
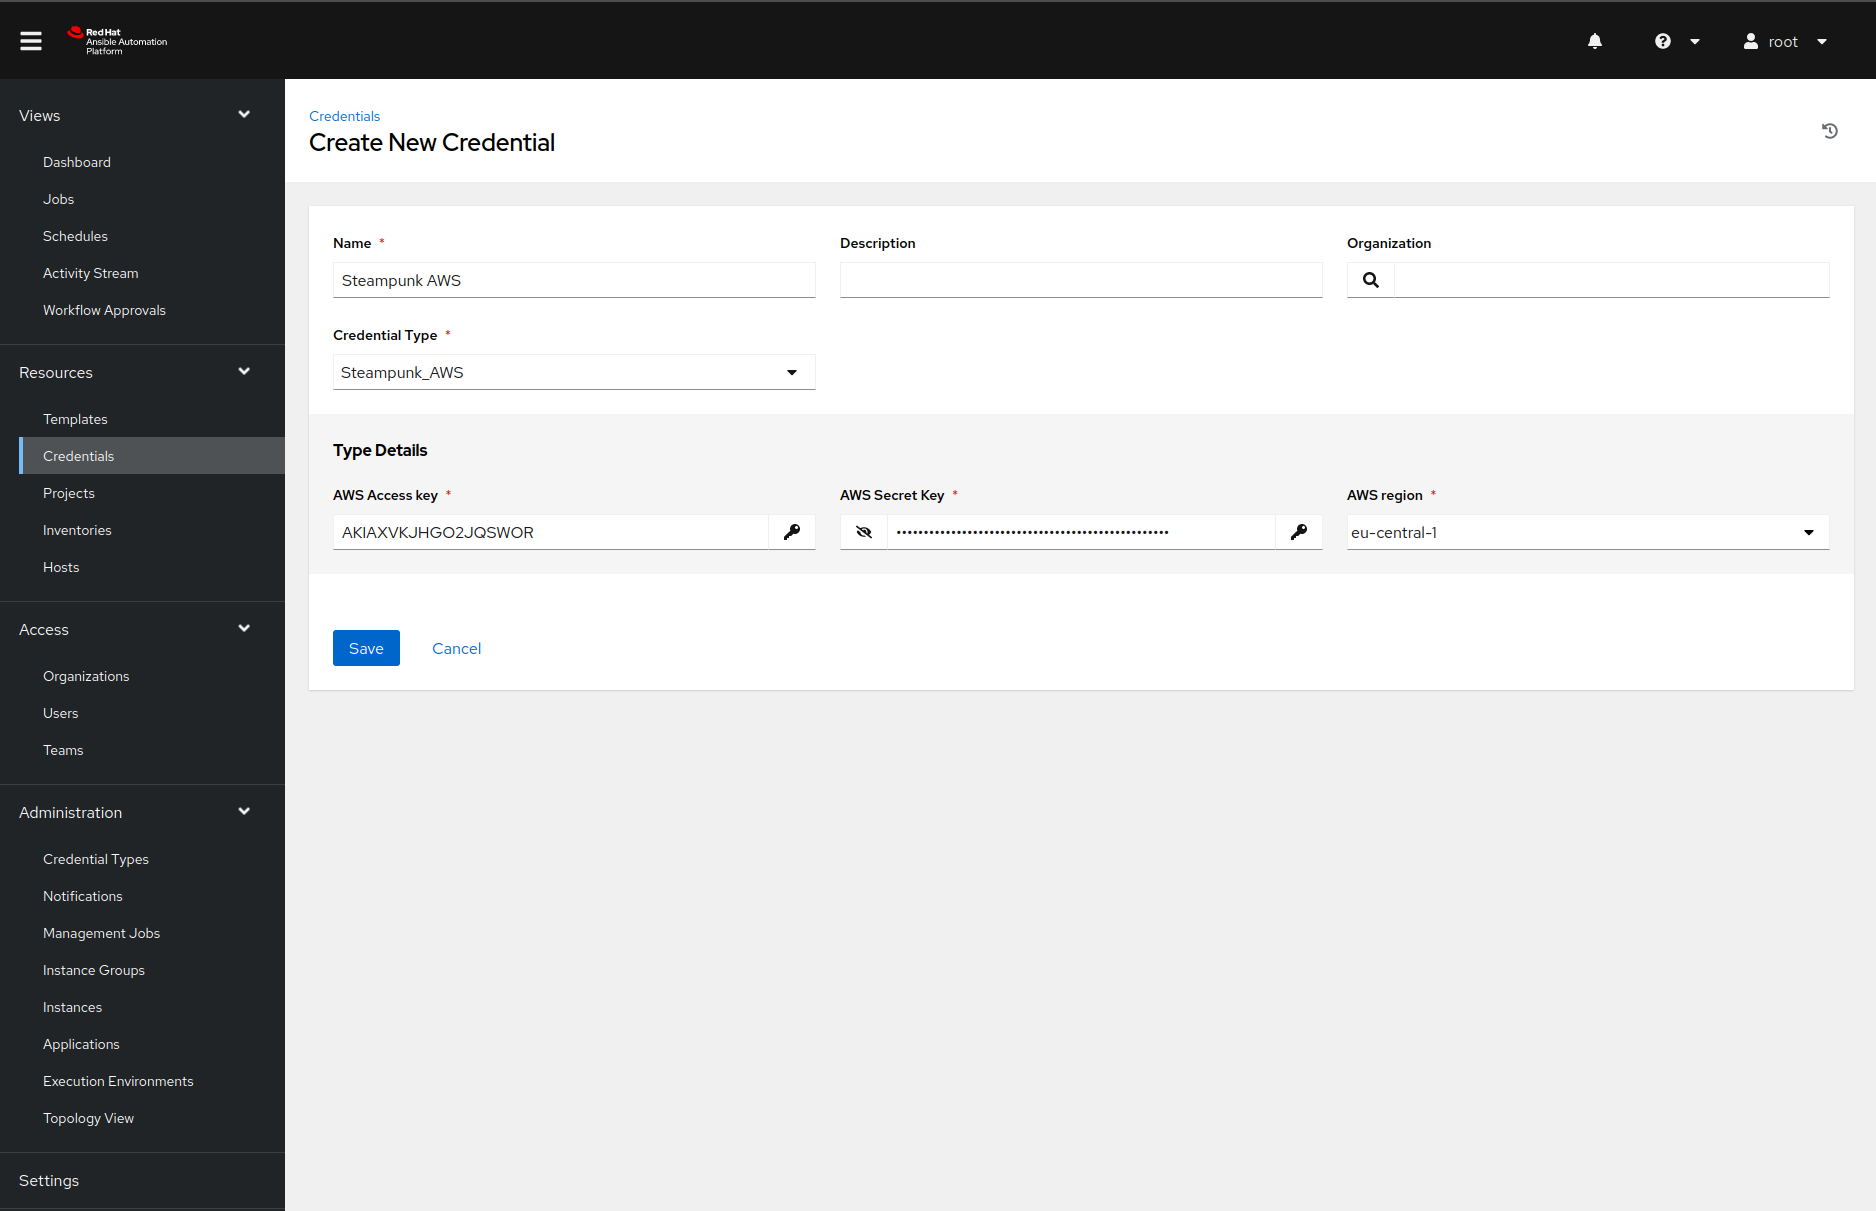
Do note that we need to select the credential type before we see the type detail fields.
Once we click on the save button, we are ready for the following configuration step.
Define an inventory
Each ansible-playbook run executes tasks on one or more hosts. We only need localhost because we
will only contact a remote web API in our playbook.
We can create one by navigating to the Inventories page, clicking on the
Add button and selecting the inventory from the dropdown menu.
Once we name the inventory, we must click the save button before navigating to the Hosts tab. After we click on the green plus button again, we must fill in the host details like this:
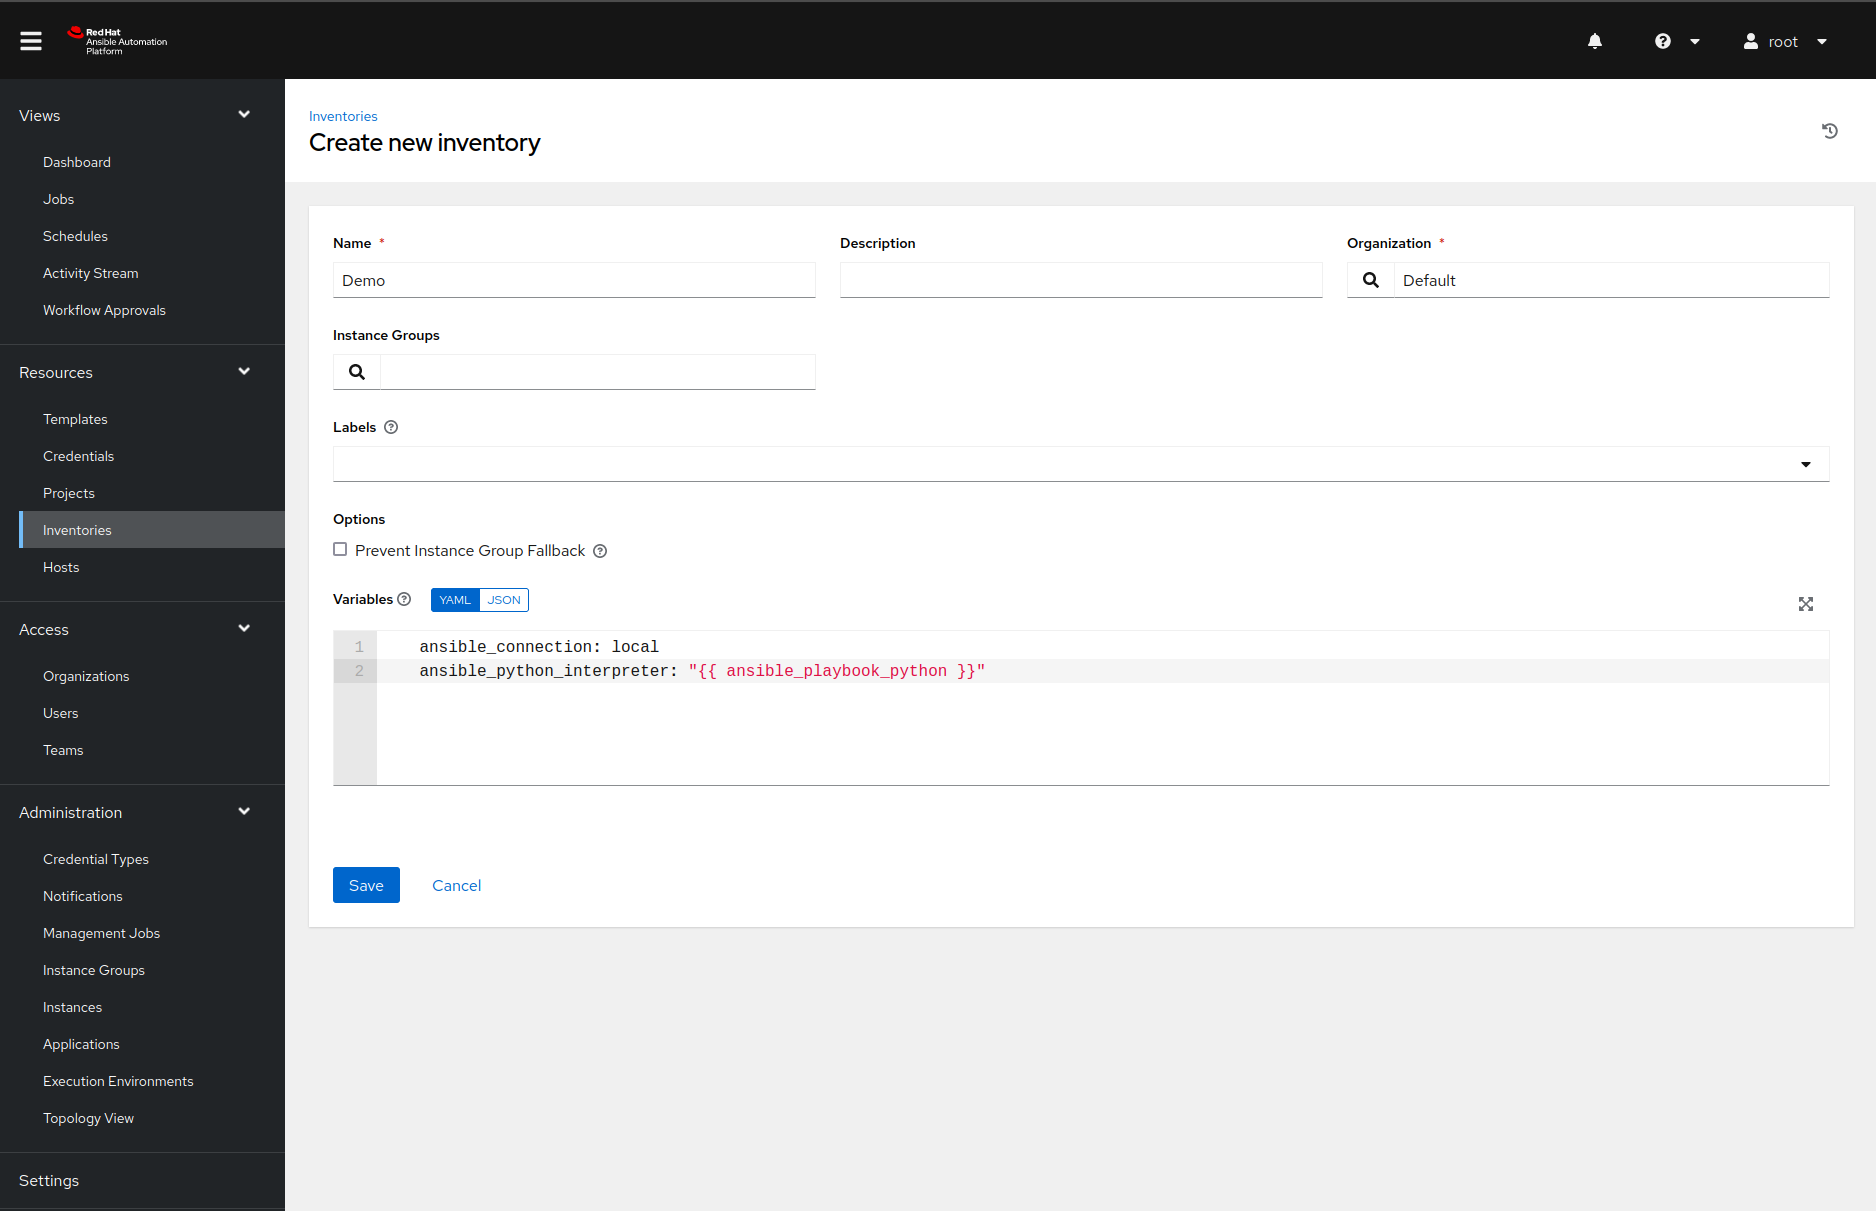
Make sure you copy the following variable definitions to the variables input field:
ansible_connection: local
ansible_python_interpreter: "{{ ansible_playbook_python }}"
If we do not set those variables correctly, Ansible will not find the packages installed in our virtual environment.
Add the job template
An Ansible Automation Platform job template is, at its core, a templated ansible-playbook
run. Job templates define what playbook the Ansible Automation Platform will execute, what
credentials and variables are available during the run, the verbosity of the
output, etc. In our case, the job template should look something like this:
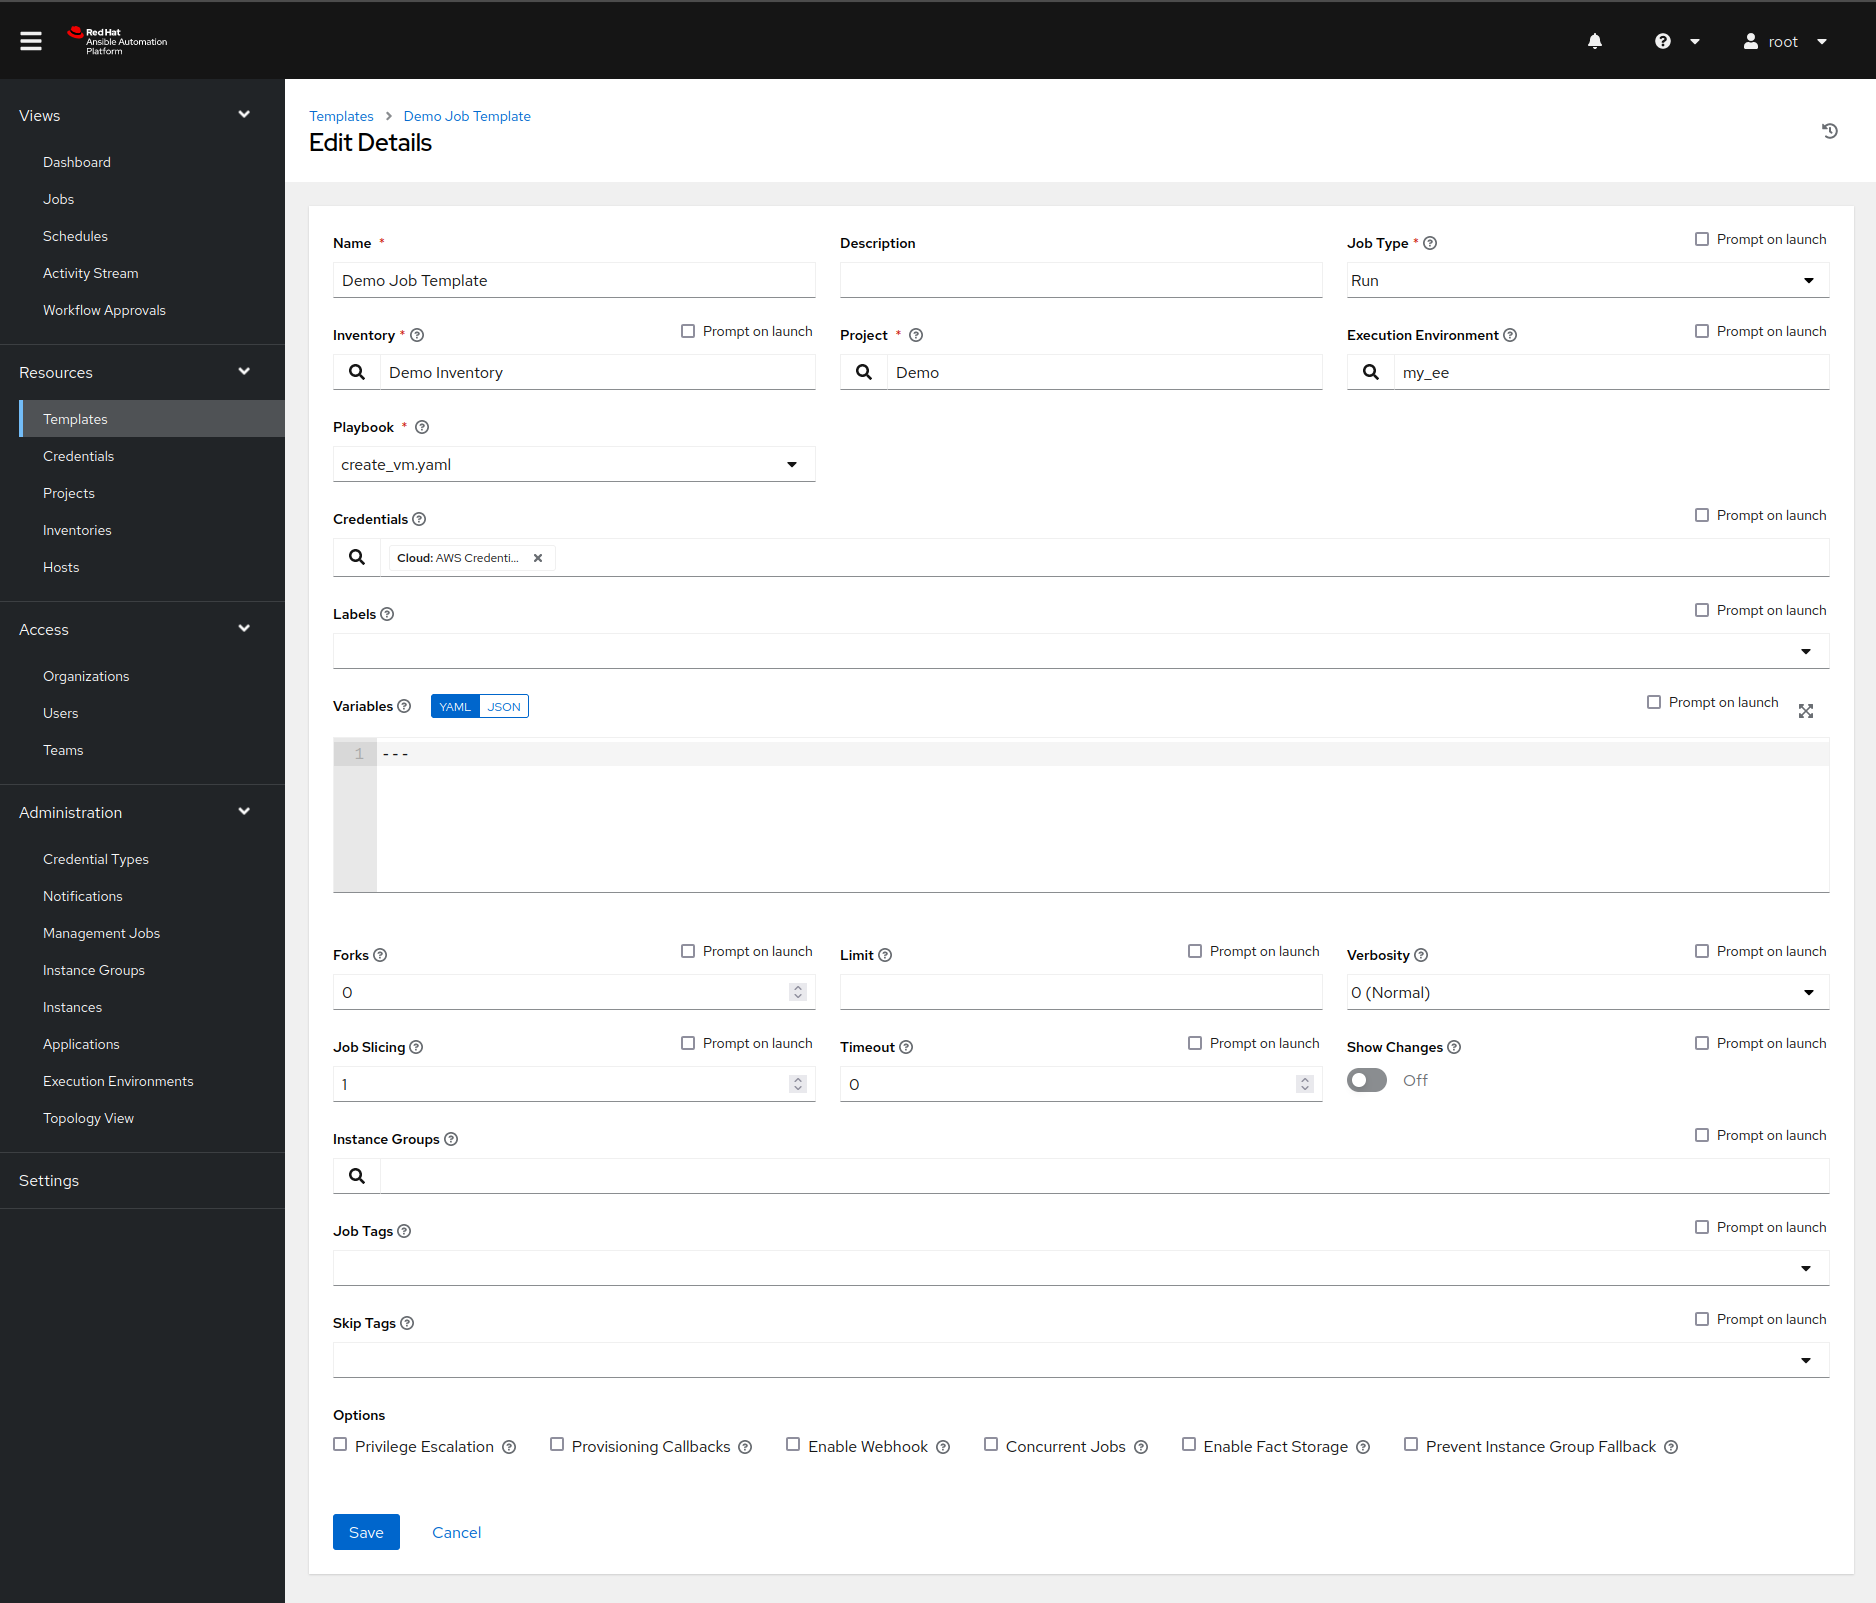
In this dialog, we collect all of the information that we defined before:
- We pick the right inventory source.
- We select an appropriate project and a playbook from it.
- We inject our AWS credentials.
We highlighted those fields in the screenshot above. But there is still something missing: values for our Ansible Playbook variables.
One option would be to define them in the extra variables field, but there is a better way of handling this: surveys. Surveys are dialogs that pop up right before we execute the job template, ask for some input data, and map the data to variables.
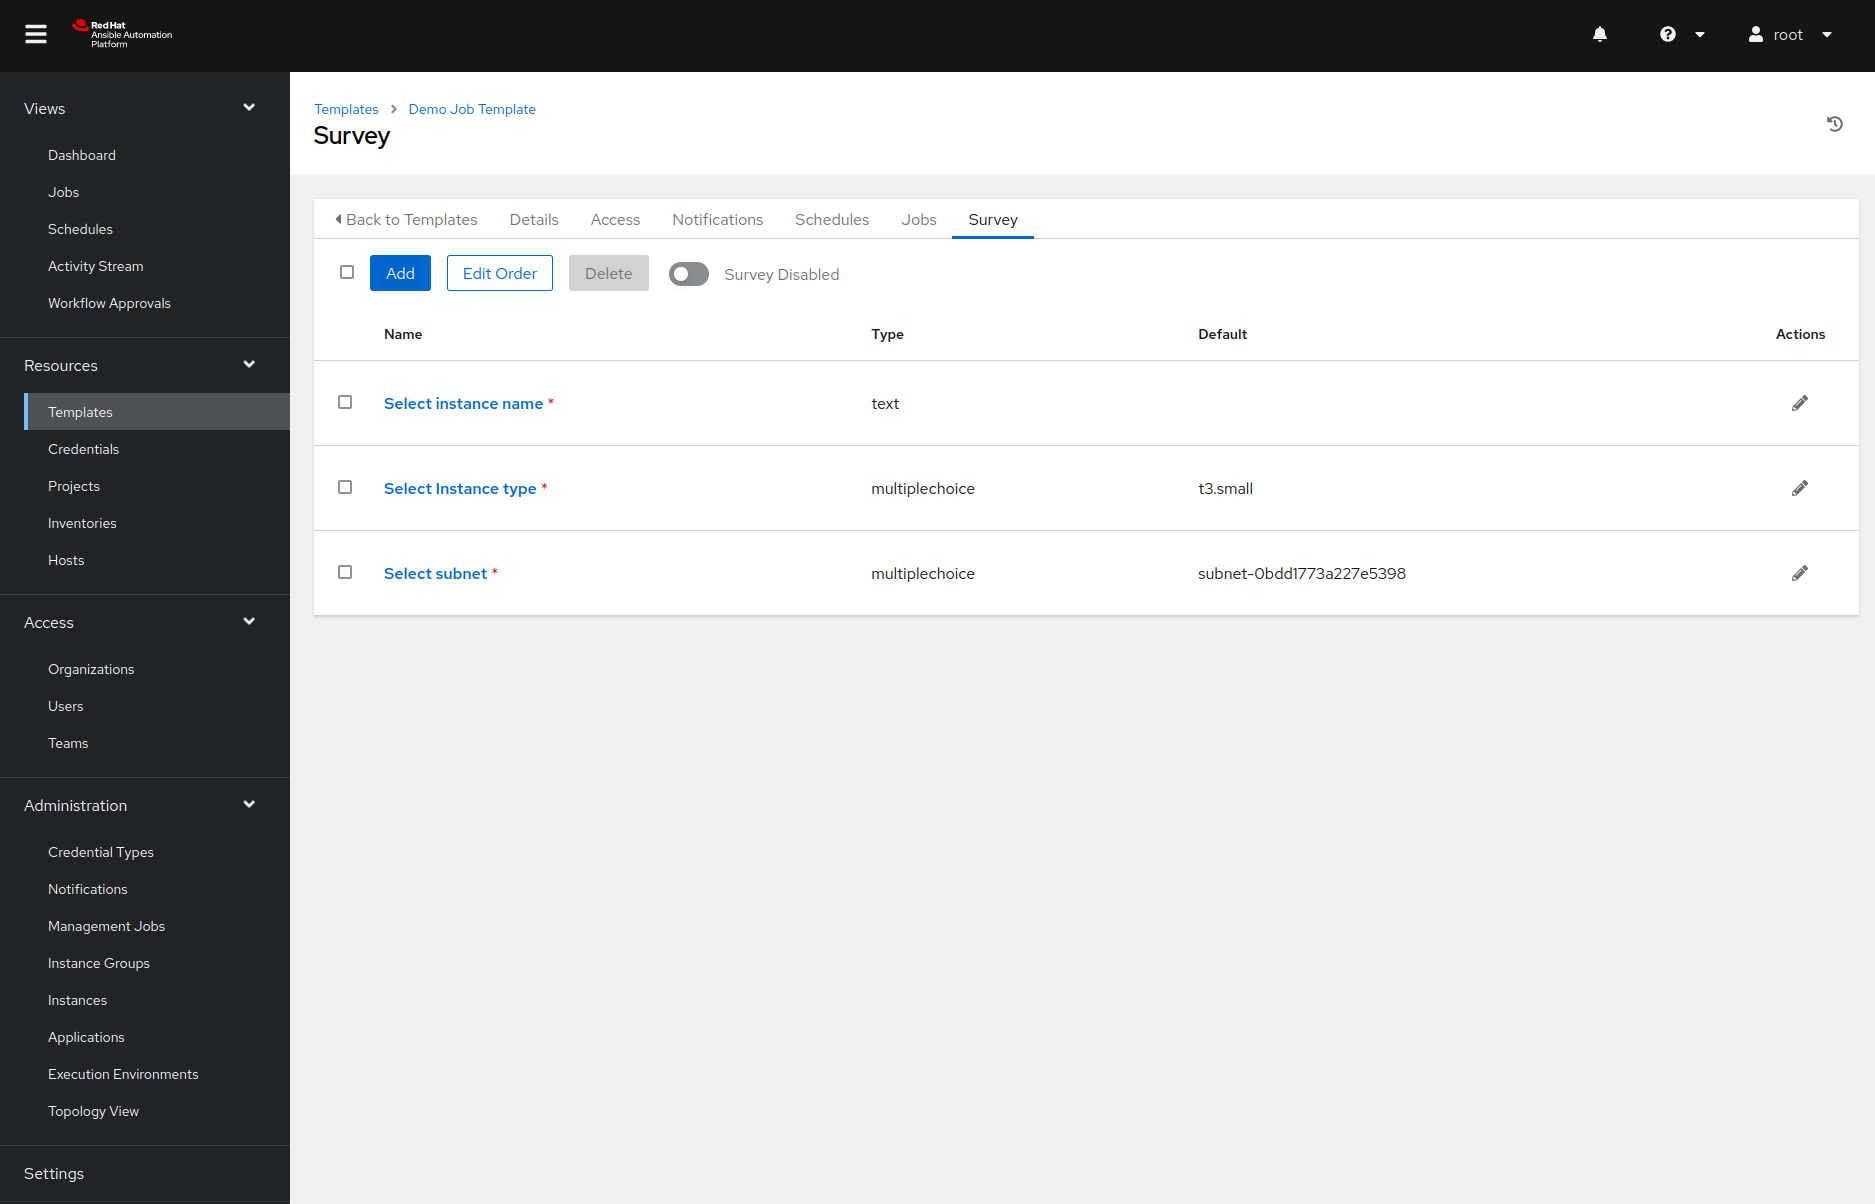
In our example, we created a survey with three prompts. The image below shows how we defined the instance type prompt. The other two prompts were defined similarly.
And with all of this behind us, we are now finally ready to create the AWS instance!
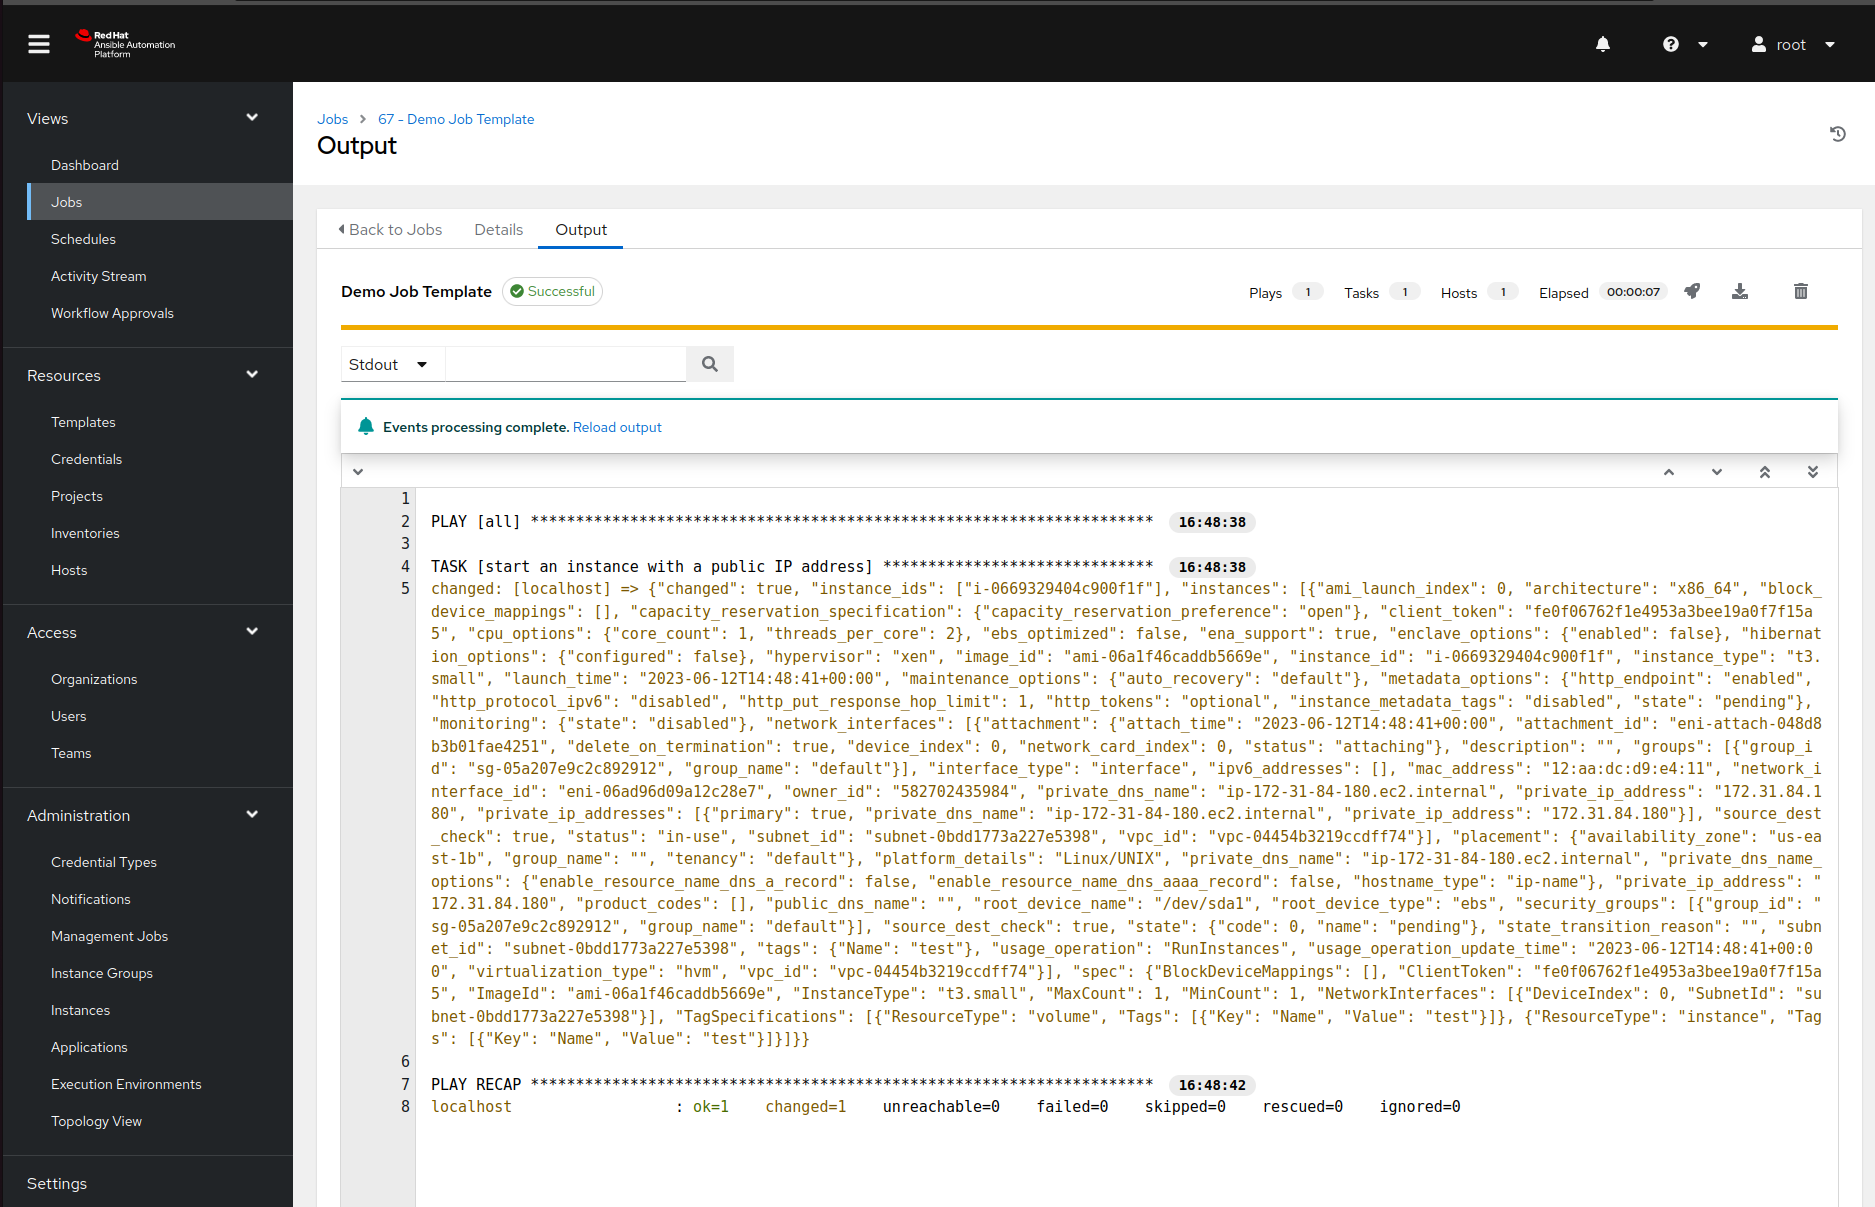
Run the job
Now it is finally time for the fun part ;) If we now navigate to the templates page and click on a rocket next to our job template, Ansible Automation Platform will pop up a survey we defined earlier. Once we enter all the required data and confirm our choices, Ansible Tower will run the playbook and display the output:
Why should you bother with all that?
To summarize, these are the things that we had to perform to create our proof-of-concept self-service catalog. We:
- created a dedicated custom execuition environment containing libraries for talking to the AWS,
- imported our playbook into Ansible Automation Platform,
- created a custom credential type and instantiated it,
- defined our inventory,
- added a job template and executed it.
If you live in a terminal and CI/CD systems are your best friends, all this clicking probably made you nauseous. But the result of all this clicking exercise is something almost anyone in the company can use. So at least in our eyes, things like this are worth the effort.
And at the end of the day, we can always write an Ansible Playbook to automate Ansible Automation Platform configuration ;) Or you can contact us, and we will help you write that playbook and fill the service catalog with some real content.
Cheers!


