


Managing preboot execution environment (PXE) boot configurations for different computers is really tedious and error-prone when done manually. There exist various projects like Cobbler that try to address this problem, but in this post, we will be using ManageIQ to manage the PXE server and its content.
I know hobbits, but what are pixies?
If you have not done so already, we encourage you to go and read the first part of our PXE saga. That post explains what pixies have to do with PXE, what we can accomplish with a little help from the PXE, and how to setup a fully functioning PXE server that you can experiment with.
Also, if you would like to follow along when we start running various commands, make sure you have a PXE server setup as described in linked PXE post or adjust the commands to fit your setup.
That being out of the way, let us start with a brief overview of what ManageIQ can do with a properly configured PXE server.
How ManageIQ manages pixies
Last time we ended up with a fully furnished pixie castle: a server with DHCP and TFTP services installed along with a PXELINUX menu file containing a single operating system (OS) entry that our pixies can serve if requested.
If we want to know what operating systems our PXE server supports, we need to manually inspect the default menu file. Clearly, there must be a less painful way of doing this, right?
Of course there is. ManageIQ is perfectly capable of inspecting the PXE server’s menu file, parsing it and extracting all available operating systems that we can boot into over the network. Detected operating systems are called images in the ManageIQ jargon and are displayed in the Compute -> Infrastructure -> PXE section of ManageIQ.
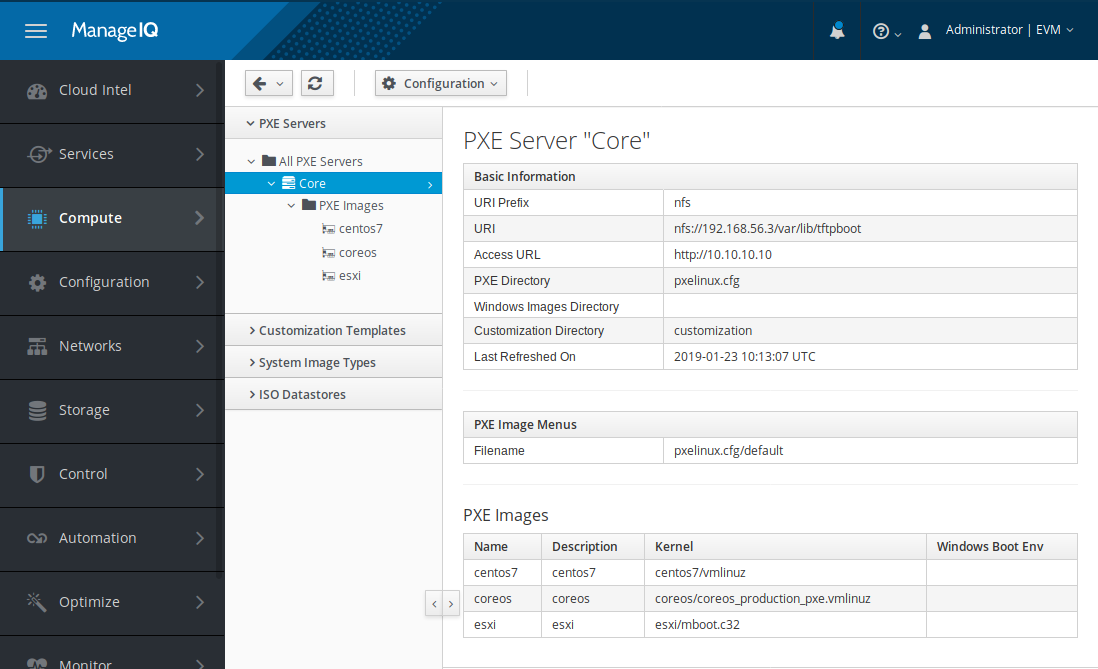
Sample PXE server operating system list.
Another usability fail of our current PXE server setup becomes visible when we
try to customize the boot process of a specific computer. For example, if we
would like to boot into ESXi installer on our computer whose network
interface’s MAC address is my:ma:ca:dd:re:ss, we would need to manually
create a /var/lib/tftpboot/pxelinux.cfg/01-my-ma-ca-dd-re-ss file on the PXE
server with the following content:
timeout 0
default esxi

label esxi
   menu label esxi
   kernel esxi/mboot.c32
   append -c esxi/boot.cfg ks=http://10.10.10.10/customization/01-my-ma-ca-dd-re-ss.ks.cfg
As explained in our previous PXE post, pxelinux.0 will try to fetch this
file before the default menu file when we boot this specific computer,
allowing us to customize boot options for this specific computer.
Thankfully, ManageIQ can take care of this menu-creating process for us. All that we need to provide it with is the PXE image that we would like to boot and the target computer’s MAC address.
Normally, when we boot into an operating system installer, we are presented with a series of prompts and questions that we need to read off the screen and manually respond to using our keyboard or mouse. Obviously this would pose a serious roadblock to automation of operating system provisioning at scale, so luckily the operating system vendors have come up with a way to install their software in an unattended, fully automatic fashion. We just need to supply a specially crafted configuration file that contains answers to all the interactive questions and prompts.
These configuration files (called kickstart files on RHEL-based distributions, sysprep scripts on Windows, ignition files on CoreOS, etc.) are usually downloaded from the HTTP server by the installation program. All we have to do is supply proper kernel command-line parameter like we did in our example ESXi-specific menu file.
And you know what? ManageIQ knows how to do that too. Even more, ManageIQ allows us to create those configuration files, store them, edit them later, and most importantly: place them on the PXE server and reference them from the PXELINUX menu file.
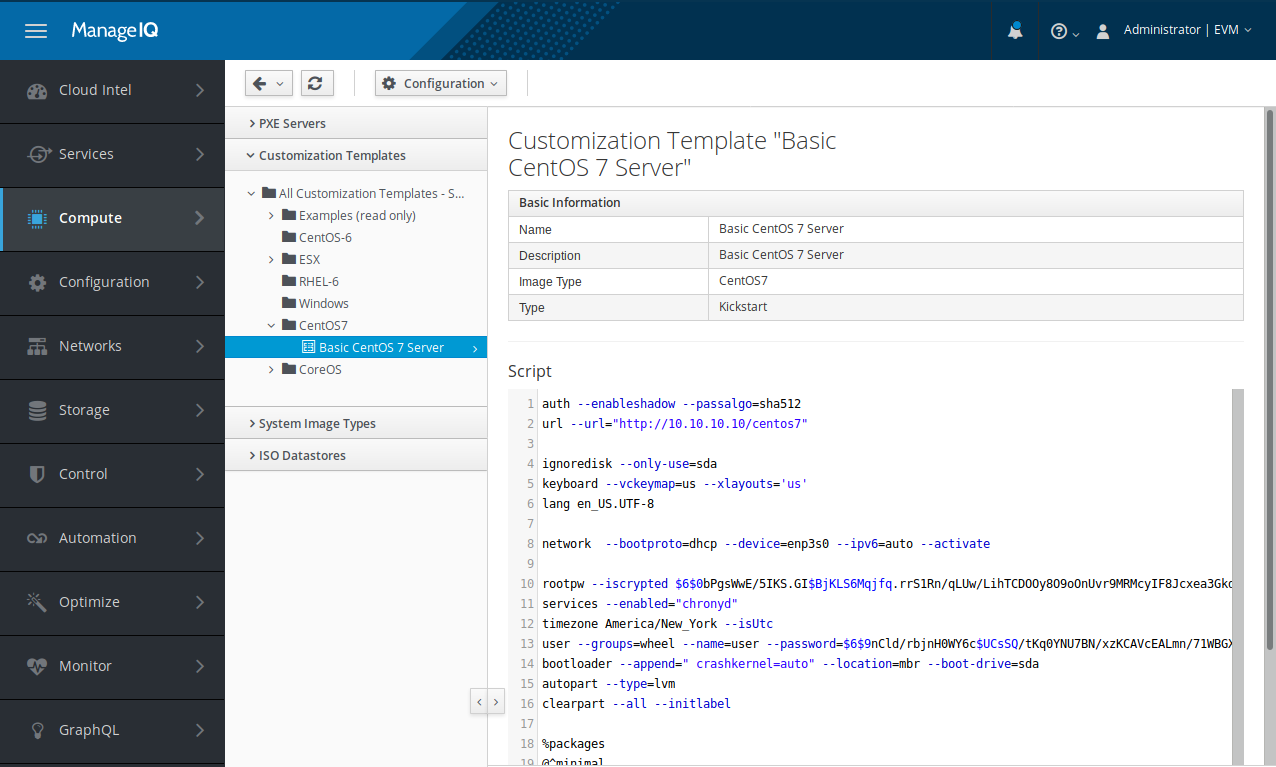
Customization template editor.
But in order to be able to do all that for us, ManageIQ needs to be able to access our pixie castle.
Installing ManageIQ door flap
As we have seen in the previous section, ManageIQ is perfectly capable of playing with pixies. In this section we will install some additional services on the PXE server that will allow ManageIQ to modify it.
First thing that ManageIQ needs is read and write access to the
/var/lib/tftpboot folder where PXE menus and customization files live. We
will expose this folder via network file system (NFS) protocol.
Installing and starting NFS server is just a matter of running a few commands that will download the required software components and open firewall ports:
# yum install nfs-utils
# systemctl enable nfs
# systemctl start nfs
# for s in nfs mountd rpc-bind; do firewall-cmd --add-service=$s; done
Now we need to configure the NFS exports by placing the following line into
the /etc/exports file:
/var/lib/tftpboot 192.168.56.1(rw,no_root_squash)
Make sure you replace the 192.168.56.1 IP address in the above listing with
the address of the computer that hosts ManageIQ. You can of course add other
options here as well if you need them, but the listed ones are required and
must be present.
We can test out NFS setup by mounting the remote file system and creating new file:
# mkdir -p /tmp/tftpboot
# mount -t nfs 192.168.56.4/var/lib/tftpboot /tmp/tftpboot
# echo hello > /tmp/tftpboot/pxelinux.cfg/01-12-34-56-78-90-ab
# umount /tmp/tftpboot
If nothing went wrong, NFS is ready to go and we can continue with installing and configuring the HTTP server.
HTTP access is not strictly needed by ManageIQ, since ManageIQ uses NFS to access the PXE server. But most of the installation programs expect configuration files for automatic installations to be available for download over HTTP.
We will be using nginx today. Why nginx and not something else? Because we are a bit more comfortable with its setup and configuration, but feel free to use any other web server here if you know how to set it up to serve static files from a folder.
# yum install epel-release
# yum install nginx
After the installation is done, we must point the HTTP server towards the TFTP
servers’ root directory by placing the following content into the
/ect/nginx/conf.d/pxe.conf configuration file:
server {
    listen 80;
    server_name 10.10.10.10 192.168.56.4;

    root /var/lib/tftpboot;

    location / {
    }
}
Adjust the server_name to fit your environment. And now it is time to start
the HTTP server, open firewall port and test it out:
# nginx -t
# systemctl enable nginx
# systemctl start nginx
# firewall-cmd --add-service=http
$ curl http://localhost/pxelinux.cfg/default
If you are doing things right, this should fail spectacularly. And we are not even joking here, since being able to serve files willy-nilly is not something that should be possible on a production server.
Now, to resolve the issue at hand, we need to give nginx permission to serve the files from TFTP server’s root folder without taking the permissions away from the TFTP server. Running the next few commands will loosen the rules just enough for this to work:
# cat <<EOF > httpd_tftp_access.te
module https_tftp_access 1.0;
require {
  type httpd_t;
  type tftpdir_rw_t;
  class file read;
}
allow httpd_t tftpdir_rw_t:file read;
EOF
# checkmodule -M -m -o httpd_tftp_access.mod httpd_tftp_access.te
# semodule_package -o httpd_tftp_access.pp -m httpd_tftp_access.mod
# semodule -i httpd_tftp_access.pp
Explaining what exactly those commands do is (way) out-of-scope for this
document. If you want to know more about SELinux, feel free to ask your
favourite search provider for more information. Or bribe us a cookie to write
something about that ;) What is important is that our curl command should
now be able to download requested file.
The last thing that we need to do before we start playing with ManageIQ is to create a folder that will contain installation configuration files.
# mkdir /var/lib/tftpboot/customization
That should do it. Time to check if ManageIQ can actually sneak into the pixie castle ;)
Introducing ManageIQ to pixies
If nothing went haywire during the installation procedure in the previous section, we should be ready to let our ManageIQ instance play with the pixies. If we navigate to Compute -> Infrastructure -> PXE and click on Configuration -> Add a New PXE Server, we will be greeted by the dialog similar to the one below.
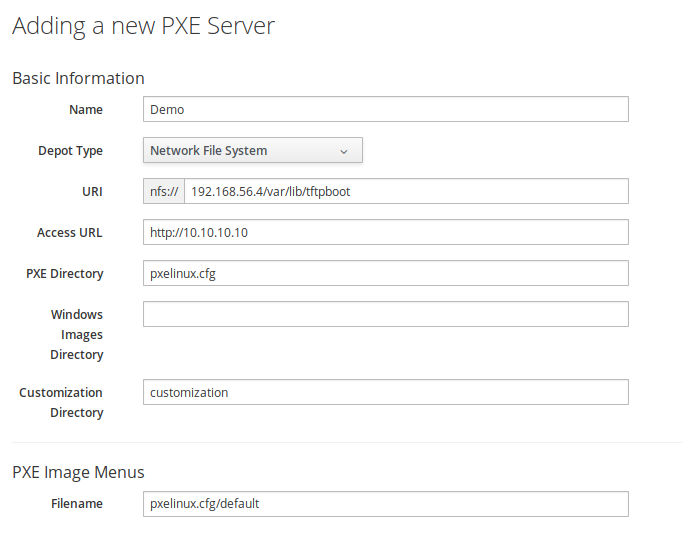
Dialog for adding a new PXE server to ManageIQ.
Determining what to put into each field can be a bit puzzling, so let us elaborate a bit.
- Name field should contain a readable display name for the newly added PXE server. Feel free to select anything that makes sense to you.
- Depot Type should be set to Network File System, since this is what we installed on the PXE server.
- URI should contain the address of the NFS mount. We already used this address when we tested the NFS availability manually.
- Access URL should hold the address of our nginx HTTP server.
- PXE Directory should contain the path to the PXELINUX menu folder, relative to the NFS mount point.
- Customization Directory should be the relative path that, when concatenated with Access URL, points to the customization folder we created earlier.
- Filename in the PXE Image Menus should be relative path to the default menu file. This menu file will be used to detect available operating systems on the PXE server.
Once we enter all of the required information and click Add, the server will be added to ManageIQ. To fetch operating system images from the PXE server, we need to click on Configuration -> Refresh Relationships, wait a bit and then refresh the page.
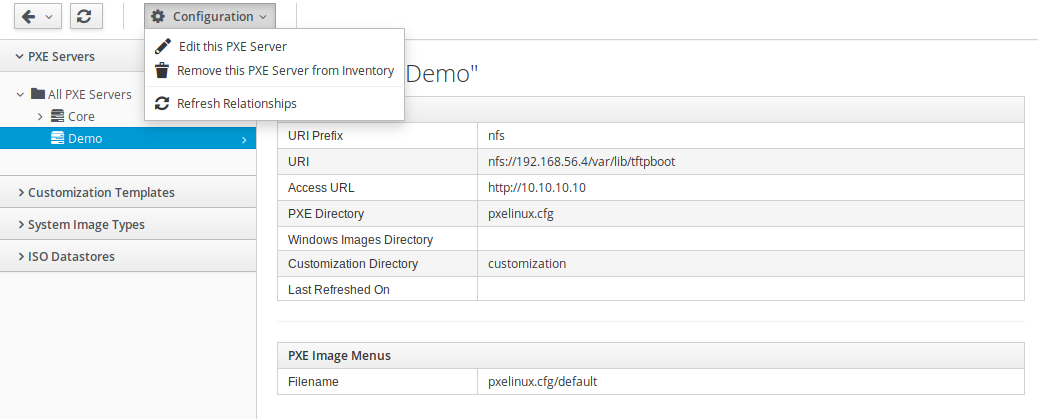
Triggering operating system image refresh process.
Did the images appear? If yes, then congratulations. If no, then also congratulations, since now you have a unique opportunity and a valid reason for digging through log files and taking things apart - just like a real Steampunk member would ;)
Keeping ManageIQ and pixies busy
Now that we have all the bits and pieces in place, we can start making something useful out of them. So join us next time when we will show you how things that we have built thus far allow us to treat physical servers almost like virtual machines in the cloud. It will be awesome, we promise ;)
As always, you can leave a comment or two about our brain-dumps on Reddit or Twitter.
Cheers!


